


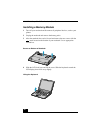


Removing a Memory Module
39
Removing a Memory Module
1 Turn off your notebook and disconnect all peripheral devices, such as your
printer.
2 Unplug the notebook and remove the battery packs.
3 After the notebook has cooled, loosed and remove the two screws with the
mark located on the bottom of your notebook. Use an appropriate
screwdriver.
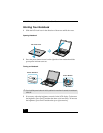
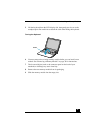
4 Slide the LCD lock lever and lift the cover. Slide the keyboard toward the
LCD display, then lift it away slightly.
5 Lift the keyboard from the LCD display side, then gently turn it over on the
touchpad space. Be careful not to detach the cable when lifting the keyboard.
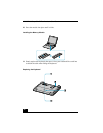
6 Touch a metal object (such as the connector panel on the back of your
notebook) to discharge any static electricity.
7 Slide the memory module out of the slot.
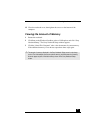
8 Gently replace the keyboard, then press it into your notebook. Be careful not
to detach the cable when lifting the keyboard.
9 Close the notebook cover, then tighten the screws on the bottom of the
computer.