


VAIO
®
Notebook User Guide
84
Adding Memory
In the future you may want to install memory modules to expand the
functionality of your computer. You can increase memory to 256 MB by
installing an optional memory module.
❑
Electrostatic discharge (ESD) can damage disk drives and other
components. Perform the procedures described below only at an ESD
workstation. If such a station is not available, do not work in a
carpeted area, and do not handle materials that produce or hold static
electricity (cellophane wrappers, for example).
❑
Ground yourself by maintaining contact with an unpainted metal
portion of the chassis while performing the procedure.
❑
Do not open the memory module package until you are ready to
install the module. The package protects the module from ESD.
❑
Use the special bag for preventing ESD or use aluminum foil when
you store the memory module.
To remove a memory module
1
Follow steps 1 to 5 of “To install a memory module.”
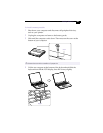
2
Touch a metal object (such as the connector panel on the back of your
computer) to discharge static electricity.
3
Remove the memory module.
4
Follow steps 8 and 9 of “To install a memory module.”
✍
If you are upgrading to 192 MB or 256 MB, you will need to remove both of the memory
modules that come with your computer. Make sure you observe the proper safety precautions
when you install a memory module in your computer. See the bulleted list below. Be careful
when adding memory. Mistakes when installing or removing a memory module may cause
malfunction.
If you are using only one memory module, you must use the slot closest to the front of the
computer.
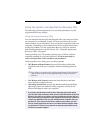
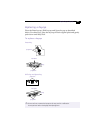
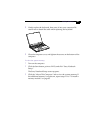
1 Pull the tabs in the direction of the arrows.
The memory module is released.
2 Pull the memory module in the direction of the arrow.