


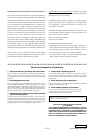


4-1
Confidential
PCG-FXA53/FXA59 (AM)
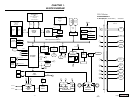
CHAPTER 4.
OTHERS
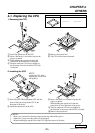
4-1. Replacing the CPU
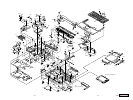
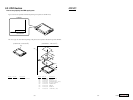
1. Removing the CPU
(END)
5 Remove the special tool.
6 The CPU can be removed upward.
1
1 Install the special tool in the CPU.
2 Insert a flat head (-) screwdriver tip into the
groove as shown.
3 While holding the special tool, slant the
screwdriver in the direction of the arrow.
4 The base under the CPU moves slightly in
the direction of the arrow and the CPU lock
is released.
NOTE :
• Do not use screwdrivers having a large tip than the width of the groove.
Otherwise, it may cause the groove to be damaged.
• When installing the special tool in the CPU, align the convex of the base.
6
3
5
1
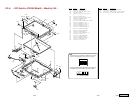
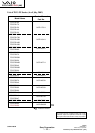
1 Insert all pins of the replacement CPU into the
holes of the base and push the CPU in the
direction of the arrow.
2 Install the special tool in the CPU.
NOTE :
Attach the CPU while
aligning the cut-out with
this position.
3
3 Insert a flat head (-) screwdriver tip into the
groove as shown.
While holding the special tool, slant the
screwdriver it in the direction of the arrow.
4 The base under the CPU moves slightly in
the direction of the arrow and the CPU is locked.
5 Remove the special tool.
5
2
2
4
4
2. Installing the CPU
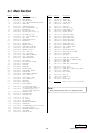
J-2507-309-1 JIG FOR COU
Fig. Part No. Description