


Configuration with the Utility Software
Procedure 1
Verifying the computer used for setup and
configuring necessary settings
Before starting setup of the Wireless LAN Converter with the Converter Setup Utility, verify the
following points.
Verify the Ethernet connector of the computer used for setup
Verify the Ethernet connector of the computer to be used for setup and provide the required Ethernet
cable.
z Hint
You can use an Ethernet cable with straight-through or crossover wiring.
Adjust the firewall settings of your computer
If you are using the Windows XP “Internet Connection Firewall” function or a personal firewall
provided by virus scanning software, it may be necessary to adjust its security level. To display the
Router Unit Setup page or Access Point Setup page, you may also need to change the proxy settings of
your Web browser. Refer to “Case 14: Computer firewall function and browser proxy settings” in the
separate Troubleshooting Guide.
Enable the Java settings of your Web browser
Procedure 2
Connecting the Wireless LAN Converter to the
computer used for setup
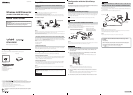
Connect the Wireless LAN Converter and the computer.
zHint
For details about how to connect the device that you want to use for wireless communication, see “Configuration with the
Quick Setup Switch”, procedure 4.
Procedure 3
Installing the utility software
Install the utility software to configure the Wireless LAN Converter (Converter Setup Utility) on the
computer used for setup.
1
Insert the supplied CD-ROM into the CD-ROM drive of the computer
where the Wireless LAN Converter is connected.
2
With computers running the Windows Me or Windows 2000 operating
system, double-click the “My Computer” icon on your desktop.
With computers running the Windows XP operating system, click “Start”
and click “My Computer”.
3
In the “My Computer” window, double-click “Setup.exe” on the
supplied CD-ROM.
The installation program starts. Follow the instructions on the screen and install the utility
software.
z Hint
Depending on the settings of your computer, the file name “Setup.exe” may be displayed as “Setup”. If there are
multiple files named “Setup” in the same folder, double-click the one with the following icon.
Procedure 4
Configuring the Wireless LAN Converter
Display the Wireless LAN Converter Setup Page and configure the necessary settings.
Compatible browsers:
Internet Explorer 5.5 or later
Netscape 6.1 or later
z Hints
• The Wireless LAN Converter Setup Page is saved in the internal memory of the Wireless LAN Converter.
• The page displayed may differ slightly depending on the firmware version of the Wireless LAN Converter.
1
Click “Start”, point to “Programs” (when using the Windows XP operating
system, point to “All Programs”), point to “Wireless LAN”, and then click
“Converter Setup”.
The Converter Setup Utility starts and automatically displays the Wireless LAN Converter Setup
Page.
z Hints
• If the “IP Address Setup” dialog box appears, make sure that the new IP address does not duplicate the address of
another device or computer on the network, and then click “Execute Setup”. Doing so temporarily changes the IP
address of the Wireless LAN Converter.
• If an error occurs, refer to the Troubleshooting Guide or Help.
2
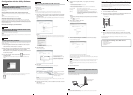
Click “Easy Setup”.
The Easy Setup page appears.
3
Click “Scan”.
The wireless networks within communication range of the computer appear.
z Hint
Instead of clicking “Scan”, you can directly enter the network name (SSID) of the access point to which you want to
establish a connection. If you do, proceed to step 5.
4
Select the network to which you want to establish a connection, and then
click “Choose”.
The Easy Setup page appears.
5
Configure the “Encryption (WEP)”, “Key Length”, and “WEP Key”
settings.
• If the access point setup is complete:
Use the same values as the one set for the access point.
• If the access point setup is not complete:
Refer to the documentation provided with the access point and enter the default values.
Encryption (WEP) : Select whether to use data encryption or not.
Key Length : Select the encryption (WEP) key length. The number of characters for
the key string depends on this setting.
WEP Key : Enter a character string to be used as the encryption (WEP) key. The
length of the string must match the encryption key length setting.
For verification, the string must be entered once more in the “WEP Key
(Confirmation)” field.
z Hints
• Encryption of wireless communications data (as selected by “Encryption (WEP)”) is used to prevent unauthorized
access by a third party. The encryption (WEP) key becomes the password necessary to join a network using data
encryption.
• Clicking or displays Help.
6
When setup is complete, click “Next”.
The setup confirmation page appears.
7
Make sure that the settings are as desired, and click “Execute Setup”.
The setup completion page appears.
When you click “Execute Setup”, the Wireless LAN Converter restarts.
If the Status indicator on the front panel of the Wireless Unit flashes slowly white, communication
with the access point is established.
Note
If the read-in condition continues after you click “Execute Setup”, check the Status indicator on the front panel of the
Wireless Unit. If the indicator flashes slowly white, setup is complete and wireless communication is possible.
z Hint
If the Status indicator flashes red, communication with the access point cannot be established. Refer to Read This
First or Help.
8
Close the Web browser.
Procedure 5
Connecting to a device equipped with Ethernet
connector
This procedure is unnecessary if you plan to perform wireless communications with the computer used
for setup. If not, disconnect the Wireless LAN Converter from the computer used for setup and connect
it to the wireless communication device.
Note
If you disconnect the Ethernet cable from the computer used for setup while it is still on, wait at least 10 seconds before
connecting it to the wireless communication device.
If You Change the Access Point Settings
If you change the settings of your access point, the connection to the Wireless LAN Converter is
severed. Reconfigure the network name (SSID) and security settings of the Wireless LAN Converter to
match the values of your access point.
Reset to Factory Defaults
1
Turn on the Wireless LAN Converter.
2
Press the reset switch on the bottom of the Wireless Unit with the end of
a paper clip or a similar object for at least one second.
Note
Be careful not to press the Quick Setup switch when you reset the Wireless LAN Converter.
3
When the Status indicator begins flashing red, release the reset switch.
The Wireless LAN Converter restarts automatically, and all settings revert to their factory default
values.
For details about the factory default settings of the Wireless LAN Converter, refer to the
Troubleshooting Guide.
For more about the following, refer to Read This First.
• Safety Information
• Names of Parts and Functions
• Installation Precautions
• Specifications
Click in Step 2.
Click “Scan” to scan for wireless
networks within communication range
of the computer. (Step 3)
Configure these settings to match
those of your access point. (Step 5)
Device equipped with an
Ethernet connector
Networks to which you can establish
a connection.
Select the network to which you want
to establish a connection, and then
click “Choose”. (Step 4)
Quick Setup switch
Wireless Unit
Reset switch