


69
nN
Using Your VAIO Computer
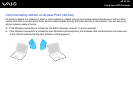
To connect to a wireless network
1 Make sure an access point is set up.
See the manual that came with your access point for more information.
2 Turn on the WIRELESS or WIRELESS LAN switch.
The WIRELESS LAN indicator lights up.
On models that support the Bluetooth functionality
*
and/or the IEEE 802.11a/b/g standard
*
, double-click ( / ) on
the taskbar to display the Wireless Device Switch window. Select your desired wireless option(s) and click OK.
3 Click Start and then Control Panel.
4 Click Network and Internet Connections.
5 Click Network Connections.
The Network Connections window appears.
6 In the right panel under LAN or High-Speed Internet, double-click Wireless Network Connection.
The Wireless Network Connection window appears.
7 Select the network you want to use.
8 Enter the network key.
9 Click Connect.
After 30 seconds, the connection is established.
* See the online Specifications to see whether your model supports the Bluetooth functionality and/or the IEEE 802.11a/b/g standard.
For more information about setting up an access point, see the manual that came with your access point.
✍
For WPA-PSK or WPA2-PSK authentication, you must enter a network key of 8 to 64 alphanumeric characters long.