


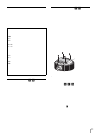

Installing the HD-SDI/SDI Input Adaptor
17
6
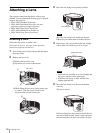
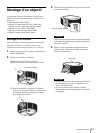
Replace the lens cover.
Align the two tabs with the slots, place the lens
cover over the lens, then tighten the two screws at
the bottom.
Note
Move the lens fixing lever completely downward.
Otherwise you cannot lock the lens.
Replacing the Lens
The procedure for replacing the lens is the same as that
for “Attaching a Lens.” Perform steps 1 to 3 to unlock
the lens fixing lever, and withdraw the lens straight
forward. Then perform steps 4 to 6 to attach another
lens.
Note
Use both hands to withdraw the lens.
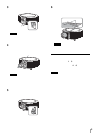
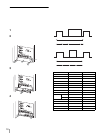
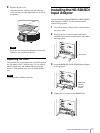
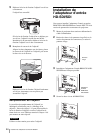
Installing the HD-SDI/SDI
Input Adaptor
You can install the optional BKM-FW16 HD-SDI/SDI
Input Adaptor in INPUT E of the connector panel
section of the projector.
1
Turn off the power of the projector and disconnect
the power cable.
2
Remove the two screws from the blank panel
attached to the connector panel section, and remove
the blank panel.
3
Insert the BKM-FW16 HD-SDI/SDI Input Adaptor
as far as it goes.
4
Tighten the two screws on the BKM-FW16.
Tabs
INPUT A
INPUT B
OUTPUT
MONITOR
R/R-Y/P
R
B/B-Y/P
B
HD
VD
G/Y
RGB
RGB
INPUT D
INPUT C
INPUT E
HDMI
Blank panel
INPUT A
INPUT B
OUTPUT
MONITOR
R/R-Y/P
R
B/B-Y/P
B
HD
VD
G/Y
RGB
RGB
INPUT D
INPUT C
INPUT E
HDMI
HDSDI/SDI
INPUT ADAPTOR
HDSDI/SDI
AUDI O
CHANNEL
BKM-FW16
HD-SDI/
SDI Input
Adaptor
INPUT A
INPUT B
OUTPUT
MONITOR
R/R-Y/P
R
B/B-Y/P
B
HD
VD
G/Y
RGB
RGB
INPUT D
INPUT C
INPUT E
HDMI
HDSDI/SDI INPUT ADAPTOR
HDSDI/SDI
AUDI O
CHANNEL