


Technical Support
StarTech.com’s lifetime technical support is an integral part of our commitment to provide industry-leading solutions. If you ever
need help with your product, visit www.startech.com/support and access our comprehensive selection of online tools, documenta-
tion, and downloads.
Warranty Information
This product is backed by a one-year warranty. In addition, StarTech.com warrants its products against defects in materials and
workmanship for the periods noted, following the initial date of purchase. During this period, the products may be returned for re-
pair, or replacement with equivalent products at our discretion. The warranty covers parts and labor costs only. StarTech.com does
not warrant its products from defects or damages arising from misuse, abuse, alteration, or normal wear and tear.
Limitation of Liability
In no event shall the liability of StarTech.com Ltd. and StarTech.com USA LLP (or their officers, directors, employees or agents) for
any damages (whether direct or indirect, special, punitive, incidental, consequential, or otherwise), loss of profits, loss of business,
or any pecuniary loss, arising out of or related to the use of the product exceed the actual price paid for the product.
Some states do not allow the exclusion or limitation of incidental or consequential damages. If such laws apply, the limitations or
exclusions contained in this statement may not apply to you.
SATA35252X, fasten SATA35252X (with drive installed) to a 3.5” drive slot, as you would a standard 3.5”
drive, by threading the drive screws into the holes on the mounting tabs.
Dual Drive Installation
Gently remove the stacking rails (shown on reverse), one at a time, from the main board.1.
Position one of the stacking rails so that the length of the rail is parallel with the side of the first drive you 2.
wish to mount, and the screw holes are suitably aligned with holes provided by the board, with the drive
label facing upward.
Repeat step #2 on the other side of the drive, positioning the remaining stacking rail in an identical 3.
fashion, parallel to the first stacking rail. Be sure to use the bottom holes on both sides).
Repeat steps #2 and #3 with a second drive, using the remaining screw holes.4.
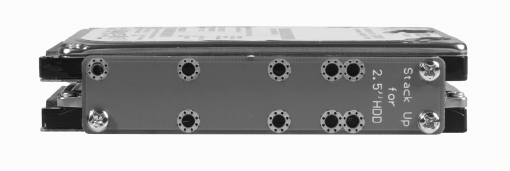
Once the drives have been secured to the stacking rails, place the (now joined) hard drives on a flat, 5.
stable surface, label side down. Position the SATA35252X main board over the drives (mounting brackets
facing down), ensuring proper alignment with the screw holes on the board in relation to those provided
by the (bottom) drive, as well as with the drive interface connectors and the board indent.
Fasten the SATA3525X main board to the base of the (bottom) drive, using the provided screws.
Attach SATA35252X (with drives installed) to a 3.5” drive slot, as you would a standard 3.5” drive, by 6.
threading the drive screws into the holes on the mounting tabs (as opposed to those found on the side of
a standard 3.5” drive).