


Instruction Manual
3
Installation
WARNING! Hard drives and storage enclosures require careful handling, especially
when being transported. If you are not careful with your hard disk, lost data may
result. Always handle your hard drive and storage device with caution. Be sure that
you are properly grounded by wearing an anti-static strap when handling computer
components or discharge yourself of any static electricity build-up by touching a large
grounded metal surface (such as the computer case) for several seconds.
Hardware Installation
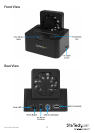
1. Connect the external power adapter from the hard drive dock to an electrical outlet.
2. Insert a 2.5” or 3.5” hard drive into the top loading slot. Make sure that the
connectors on the hard drive are facing the same corner of the slot that has a cutout
in the door. The label on the hard drive should face the front of the hard drive dock.
3. Connect the included USB 3.0 cable from the hard drive dock to an available USB 3.0
or 2.0 port on the computer system. The computer can be on or o.
NOTE: A USB 2.0 A-B cable could be used as a substitute on the hard drive dock but
will be restricted to USB 2.0 speeds.
or
Connect the included eSATA cable from the hard drive dock to an available eSATA port
on the computer system. The computer can be on or o.
NOTE: It is not recommended that both USB and eSATA be connected at the same
time, however eSATA will be the default connection if both are connected.
4. Press the power button on the rear of the hard drive dock. The Power LED next to
the power button as well as the LED on the top of the dock will light up.
NOTE: If no host connection is detected (USB cable unplugged or computer turned
o), the dock will automatically go into Suspend Mode and power down the SATA
drive until an active host connection is detected. The LED on the top of the dock will
turn o however the LED on the rear of the dock will stay lit.
5. The operating system will automatically detect and install the SATA drive. Once
complete, the drive should be ready for use.
6. Adjust the fan speed control dial on the side of the docking station, to the desired
speed or turn it o completely.