SVL-A, SVL-B, SVL-C, & SVL-D Self-Contained Material Loaders - Venturi Style 34 of 49
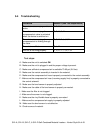
5-4 Troubleshooting
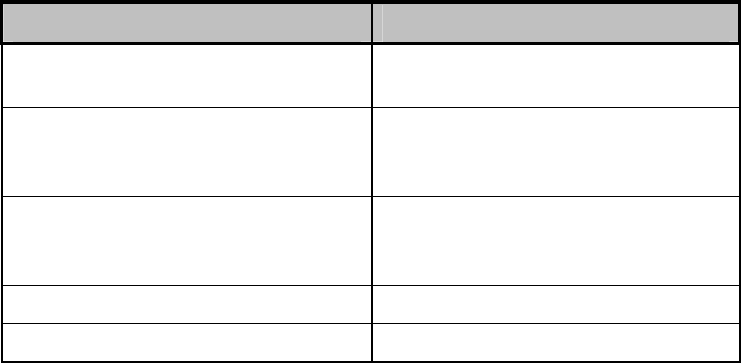
PROBLEM REMEDY (See Test Steps Below)
The unit is not conveying and is not
active.
A, B, G, H
The unit is not conveying; the
compressed air valve is activated
when the device is switched on.
C, D, E, F, N
The unit is not conveying; the
compressed air is flowing through
the valve.
C, D, E, F, I, J, K,N
The unit is overfilled. G, L, M
The unit is not filling properly. C, D, E, F, I, J, K, L,N
Test steps:
A - Make sure the unit is switched ON.
B - Make sure the unit is plugged in and the proper voltage is present.
C - Make sure sufficient compressed air is available 70-90 psi (5-6 bar).
D - Make sure the venturi assembly is inserted in the material.
E - Make sure the compressed air hose is properly connected to the venturi assembly.
F - Make sure the compressed air hose (incoming supply line) is properly connected to
the control solenoid.
G - Make sure the level sensor is properly adjusted.
H - Make sure the cable of the level sensor is properly connected.
I - Make sure the filter is not clogged.
J - Make sure the screen is not clogged.
K - Make sure the vinyl flexible hose is properly connected.
L - Make sure the compressed air supply is properly adjusted.
M - Make sure the level sensor is not defective.
N - Check source of material.


