


MMR-8 Tascam MMR-8 Owner’s Manual • Chapter 3 • MMR-8 Operation
63
Once a track is loaded into a track index, it is removed from the “pool” of tracks available for direct
loading, but it may be moved from its current track index position to another track index position. If a
track from the project is already loaded into a track index, then choosing (scrolling to) that track name in
the list of tracks will cause the MMR to ask if you want to Move that track to the currently selected Track
index. If a track is moved from its current track index position to a new track index by this method, the
previous Track index will then be empty and will show *Blank* when viewed using the TRACK key
(View Track state). If you do not wish to move a currently loaded track into an empty Track Index, use
the arrows or Wheel to scroll through the list of available tracks to find currently unloaded tracks which
may then be loaded into the empty track index. If track information is stored into a track location that is
already occupied by a previously loaded track, the previously loaded track is automatically “unloaded.”
Press TRACK again (or press CLR) to exit the Track state and return the MMR-8 to the Normal state.
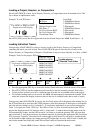
Viewing Tracks
To view which tracks are currently loaded, press TRACK, which puts the MMR-8 into the View Tracks
state. Use the Wheel, the arrow keys, or the Select keys to select which track index to view. If nothing is
loaded for a given track, the word “*Blank*” is displayed for that track in the LCD.
Unloading Tracks
To “unload” a loaded track and return the track to the “blank” state, while returning the loaded track back
to the pool of unloaded tracks, put the MMR-8 into “view tracks” mode by pressing the TRACK key.
Select the track you wish to unload, and press SHIFT+TRACK. The displayed track will be “unloaded”,
and the word “*Blank*” will appear in the display.
Deleting Tracks from the Disk
To delete a displayed track, enter the Load Tracks state by pressing the LOAD TRACK key, and
descending through the project/file hierarchy as detailed above. Select the track you wish to delete, and
press SHIFT+LOAD TRACK. Deletion simply removes the track edit information (the “EDL”), not the
associated sound files, so very little disk drive space is reclaimed by this operation. However, sound files
not associated with any track edit information may be deleted from the disk by using the Disk Cleanup
function (found in Setup Menu 720). This is the typical method by which space on a given disk drive
volume is reclaimed. The other method is by using Tape Mode or Auto Cleanup Record mode to record
over existing material.
Recording a New Project
The MMR-8 may currently record only to the mounted drive with the lowest SCSI address. This is
usually the internal Kingston carrier, but any drive may be set to be the lowest numbered SCSI drive. If
multiple volumes are mounted, any or all drives can be used for playback, but only the drive with the
lowest SCSI ID will be recorded to. See the manual for the Kingston drive carrier for instructions on
changing the SCSI ID of the carrier.
When attempting to record to a new drive for the first time, it will be necessary to first Initialize the drive
so that audio may be recorded to it. The MMR-8 will currently format drives only for the WaveFrame
audio file format. To Initialize a drive, go to menu 710 and select the SCSI ID of the volume to be
initialized by pressing the TRIM key and turning the wheel or using the Up/Down arrow keys until the
SCSI ID of the drive appears as the selection. If the SCSI ID does not appear, be sure there is no SCSI ID
conflict between any of the attached drives and that the desired target drive is connected and turned on.
Reboot the MMR-8 with the desired target drive on line and look for it again in menu 710.