


2. PRINTER SETUP
ENGLISH VERSION EO1-33048
2.8 Installing the Printer Drivers
E2-33
(1) Log on to your host computer as a member who has full control access privilege concerning the
printer settings.
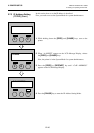
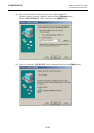
(2) Select “Settings” – “Printers” from the “Start” menu to open the printer folder.
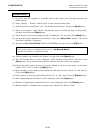
(3) Double-click on the “Add Printer” icon. The Add Printer Wizard runs. Click on the [Next] button.
(4) Select “My Computer”, then click on the [Next] button.
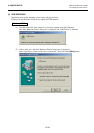
(5) Select the port to be used for printing from the “Available ports” list, then click on the [Next] button.
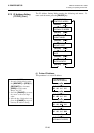
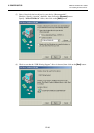
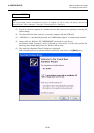
(6) On the screen listing “Manufacturers and Printers”, click on the [Have Disk…] button. The “Install
From Disk” dialog box is displayed.
(7) Specify the “\driver\WinNT4” folder in the CD-ROM drive, then click on the [OK] button.
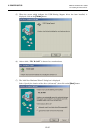
(8) Select the printer to be installed from “Printers” list, then click on the [Next] button.
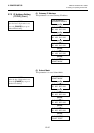
(9) The screen to select the existing installed printer driver or use the new one, is displayed. Select
“Replace existing driver”, then click on the [Next] button. If you install the printer driver for the first
time, this screen is not displayed.
(10) Change the printer name if necessary, and select whether or not you use the printer as the default
printer (“Yes” or “No”). Click on the [Next] button.
(11) Select whether or not the printer will be shared with other network users (“Shared” or “Not shared”).
Click on the [Next] button.
(12) Select whether or not the test page will be printed (“Yes” or “No”), then click on the [Finish] button.
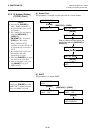
(13) The printer driver is installed. When installation is completed, the new printer icon is added in the
“Printers” folder.
Windows NT4.0
N
OTE:
The latest printer driver is available from the web site, “the Barcode Master”.
(http://barcode.toshibatec.co.jp/Eng/index.html)