


1 PREPARATION
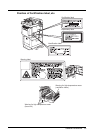
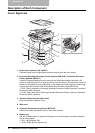
30 Description of Each Component
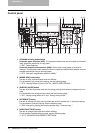
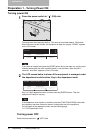
1. Original glass
Use this to copy three-dimensional originals, book-type originals and special paper such as
overhead transparencies or tracing paper, as well as plain paper.
P.52 “Placing Originals”
2. Control panel
Use this to perform copying, key in the copy quantity, or set other functions.
P.32 “Control panel”
3. External Keyboard (optional, GJ-1040)
Use this when using the optional scanning and Fax functions to select destinations.
4. Toner cartridge
P.16 “Recommended toner cartridges”
P.189 “Replacing Toner Cartridge”
5. Power switch
Turn the power of the equipment ON or OFF with this.
P.36 “Preparation 1 - Turning Power ON”
6. Paper exit stopper
Use this to prevent the exiting paper from falling. Open this when you make a large amount
of copies on a larger size of paper (e.g. LD, LG).
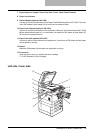
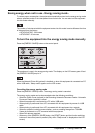
7. AC-IN terminal
Use this to connect the co-packed power cable and the equipment.
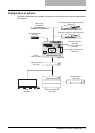
8. USB terminal (4-pin)
With this terminal, the equipment can be connected to your PC using a commercially avail-
able USB cable.
y Use a USB2.0 Hi-Speed certified cable: USB cable supporting the USB2.0 Hi-Speed
mode (480 Mbps of transfer speed) certified by the USB Implementers Forum.
y Connect the equipment with a PC directly by the USB cable. When it is connected with a
PC via a USB hub, the equipment may not be recognized.
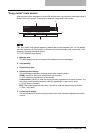
9. Receiving tray
10. Scanning area
The data of originals transported from the Reversing Automatic Document Feeder (optional,
MR-3019)/Automatic Document Feeder (optional, MR-2017) are scanned here.
P.202 “Daily Inspection”
11. Original scale
Use this to check the size of an original placed on the original glass.
12. Platen sheet
P.202 “Daily Inspection”