


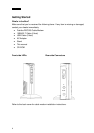


Installing the Cable Modem
To avoid thermal problems, allow at least one inch spacing between the
ventilation holes and any object to either side of the unit. It's best to have no
obstructions on top of the unit. The top of the unit should be at least two
inches from any obstruction.
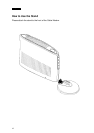
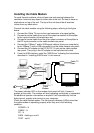
Connect the cable modem using the following steps, referring to the figure
below.
1. Connect the Cable TV coax to the input connector of a signal splitter.
2. Connect a coaxial cable from one of the output connectors of the splitter
to the input connector of the television set.
3. Connect a coaxial cable from the other output connector of the splitter to
the RF input connector on the cable modem rear panel.
4. Connect the 10Base-T and/or USB signal cable(s) from your computer(s)
to the 10Base-T and/or USB connector(s) on the cable modem rear panel.
5. Connect the AC adapter to the DC IN 12V 1A jack on the cable modem
rear panel. Then plug in the AC adapter to the wall electrical outlet.
6. If use the USB interface, install the “USB Driver” following the instructions
described in “Installing USB Drivers” in this manual.
The power indicator LED on the modem front panel will light, if power is
present at the outlet. The modem will start operating once power is connected.
No additional operator intervention is required. It will automatically find the
data channel, register and connect to your computer.
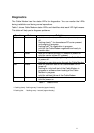
Check the cable modem status. The front panel indicators (LEDs) show that
the cable modem is operating properly when they are in the following
condition:
POWER – lit
CABLE - lit
PC - lit
DATA - flashing or not lit
TEST - not lit
Splitter
A
C Ada
p
tor
Television
10BaseT
Connection
Cable
Modem
Cable TV
Coax
USB
Connection