


Click Start, point to the arrow icon ( ) and then select Sleep
from the menu.
Close the display panel. Please note that this feature must be enabled
within the Power Options (to access it, click Start -> Control Panel ->
System and Security -> Power Options).
Press the power button. Please note that this feature must be enabled
within the Power Options (to access it, click Start -> Control Panel ->
System and Security -> Power Options).
When you turn the power back on, you can continue where you left when
you shut down the computer.
When the computer is in Sleep Mode, the power indicator will blink
amber.
If you are operating the computer on battery power, you can lengthen
the overall operating time by turning it off into Hibernation Mode -
Sleep Mode will consume more power while the computer is off.
Sleep Mode limitations
Sleep Mode will not function under the following conditions:
Power is turned back on immediately after shutting down.
Memory circuits are exposed to static electricity or electrical noise.
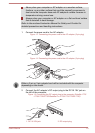
Hibernation Mode
The Hibernation Mode feature saves the contents of memory to the hard
disk drive when the computer is turned off so that, the next time it is turned
on, the previous state is restored. Please note that the Hibernation Mode
feature does not save the status of any peripheral devices connected to the
computer.
Save your data. While entering Hibernation Mode, the computer saves
the contents of memory to the hard disk drive. However, for safety
sake, it is best to save your data manually.
Data will be lost if you remove the battery or disconnect the AC
adaptor before the save is completed. Wait for the Hard Disk Drive/
Optical Disc Drive indicator to go out.
Do not install or remove a memory module while the computer is in
Hibernation Mode. Data will be lost.
Benefits of Hibernation Mode
The Hibernation Mode feature provides the following benefits:
Saves data to the hard disk drive when the computer automatically
shuts down because of a low battery condition.
User's Manual
1-9