


4 Replacement Procedures
Satellite A300/Satellite Pro A300/EQUIUM A300/SATEGO A300 Maintenance Manual 4-iii
Chapter 4 Contents
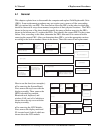
4.1 General....................................................................................................................... 4-1
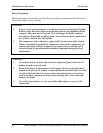
Safety Precautions................................................................................................ 4-2
Before You Begin ................................................................................................4-4
Disassembly Procedures ...................................................................................... 4-5
Assembly Procedures........................................................................................... 4-5
Tools and Equipment ........................................................................................... 4-6
Screw Tightening Torque .................................................................................... 4-6
Colors of Screw Shanks....................................................................................... 4-7
Symbols of Screws on the Computer Body ......................................................... 4-7
Symbol examples................................................................................................. 4-7
Removing the Battery Pack ................................................................................. 4-8
Installing the Battery Pack................................................................................... 4-9
Removing the Optional PC Card ....................................................................... 4-10
Installing the Optional PC Card.........................................................................4-11
Removing the Momery Card ............................................................................. 4-12
Installing the Momery Card............................................................................... 4-12
Removing the Optional Memory ....................................................................... 4-13
Installing the Optional Memory......................................................................... 4-14
4.2 HDD......................................................................................................................... 4-15
Removing the HDD ........................................................................................... 4-15
Installing the HDD............................................................................................. 4-17
4.3 ODD Bay Module .................................................................................................... 4-18
Removing the ODD Bay Module ...................................................................... 4-18
Installing the ODD Bay Module........................................................................ 4-19
Disassembling the ODD Bay Module................................................................ 4-20
Assembling the ODD Bay Module.................................................................... 4-20
4.4 Keyboard Cover and Keyboard ............................................................................... 4-21
Removing the Keyboard Cover and Keyboard.................................................. 4-21