


45
Operations
44
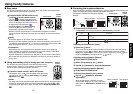
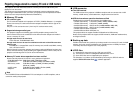
[Off]: Displays the Input select menu.
Toggle with
buttons and press
button. (The input without signals can be
selected.)
[Power on]
Note that if [Power on] is set to [Auto], then if the main power switch is ON when
power is restored after a power outage, the projector will come on.
[Easy setup]
<Auto keystone>: Switches on/off the automatic keystone distortion correction when the
EASY SETUP button is pressed or when Power on Easy setup is set to ON.
<Auto-setting>: Switches on/off the auto-setting function when the EASY SETUP
button is pressed or when Power on Easy setup is set to ON.
<Power on Easy setup>: Switches on/off the Easy setup operation when the power is
turned on.
Note
• The Easy setup automatically switches off when [Ceiling] or [Rear ceiling] is
selected for projection mode.
[Lamp power]
When [Lamp power] is set to [Low], the screen becomes a little darker, but the cooling
fan noise gets quieter.
Notes
• The lamp power selection that you made will not be switched in about 1 minute after
the power is on.
•For lamp protection, even it has been set to [Low], the lamp power mode stays in
[Standard] in about 1 minute after the power is on, and then it will be switched to
your desired selection mode.
[Fan mode]
Setting [Fan mode] to [High] increases the cooling fan speed. Set this option to use the
projector, for example, at high altitude (over 1,500 meters above sea level).
[Wireless standby]
When [Wireless standby] is set to [On], the wireless LAN is switched to the standby state
as the projector enters standby. While the wireless LAN is in standby, the projector can be
powered on using the remote control function of the Wireless Utility.
When [Wireless standby] is set to [Off], the projector cannot be powered on with the
remote control function of the Wireless Utility.
[Remote control]
Sets a remote control code from 4 types. You can set each code respectively for up to 4
projectors. The factory setting is [1].
To switch codes, set the same code for the projector and the remote control.
A remote control code is applied after the setting is done.
•You cannot operate the remote control if the codes of the projector and the remote
control do not match.
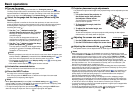
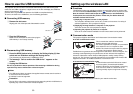
Remote control code setting for remote control
Remove the battery cover and set the same remote control code
switch as the projector.
p.16
(Use a screwdriver with thin tip to set.)
[Key lock]
Protect from operating errors by locking on the control panel buttons of the projector.
(The remote control operations are available.)
Control panel operations are locked after the setting is done.
•To release the key lock, press the control panel’s RETURN button for 10 seconds. The
key lock is released with a beep sound.
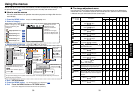
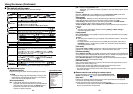
Computer 1 (Digital)
Y/P
B/PR 1 (Digital)
Computer 1 (Analog)
Y/P
B/PR 1 (Analog)
Computer 2
Y/P
B/PR 2
Computer 3
Y/P
B/PR 3
Video
S-video
Wireless / Card
USB memory
Input select
/ shows whether signal is
input or not.
Input select menu
Using the menus (Continued)
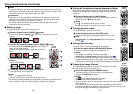
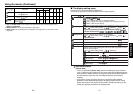
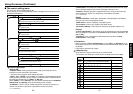
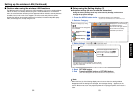
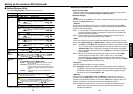
■ The default setting menu
This menu shows placement status and other settings.
Description
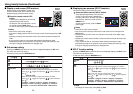
Wireless standby
Item
Projection
mode
Blackboard
mode
No signal
power off
Auto input
search
Power on
Easy setup
Lamp power
Fan mode
Remote control
Key lock
Reset all
Password
Sets projection mode in accordance with Placement Style.
When projecting on a non-screen surface, select a color in accordance
with the projecting surface.
Press and switch with and .
Off/Green/Black/Brown/Blue/Beige
Set the time to wait for the power to be turned off after the last
operation is made with no input signal.
Press and switch with and .
Off (not turned off)/1 min./5 min./10 min./30 min./60 min.
Set whether the input with signals is only selected or not.
Sets whether to turn on the power when the ON/STANDBY button is pressed
(Manual), or when the main power switch is turned on (Auto).
Manual Auto
Set the items of Easy setup and power ON/OFF.
[ or : Enter setting mode] [ : Select item] [On Off]
Auto focus
Auto keystone
Auto-setting
Power on Easy setup
Sets the lamp power.
Sets the cooling fan speed.
Switch on/off the wireless LAN while the projector is in standby.
When two or more projectors are used and controlled by the remote
control respectively, this menu sets the code for the projector and the
remote control.
[ or : Enter setting mode] [ : Select item] [ :
Select from 1, 2, 3, 4] [ :Confirm] [ :Select OK to end]
Press [Cancel] to return.
Lock the control panel buttons.
[ or : Enter setting mode] [ : Select item] [ :
Select On/Off] [ :Confirm] [ :Select OK to end]
Press [Cancel] to return.
Press . (The password and user logo are not reset.)
Resets all adjustments and settings to their factory settings.
Password function
When [Password] is [On], the Password Setting screen is displayed.
p.22
p.36
On Off
On
On Off
On Off
(Rear
ceiling)
(Standard)
(Rear) (Ceiling)
Yes No
Off On
On Off
Standard High
Low Standard
On Off
Detailed description
[Blackboard mode]
Projects the image in colors more like projecting on a screen.
Note
•
The projected image may differ depending on the type, color,
and material of the blackboard and wall even if the selected
color is the same as the projected screen.
[Auto input search]
[On]: Automatically searches the signals that can be
projected, and switches input from the connected device
that outputs the signals each time the INPUT button is
pressed. The input from the connected device that
outputs no signals is skipped.