


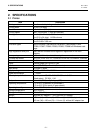


5. INSTALLATION PROCEDURE
EO1-13016
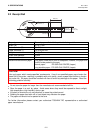
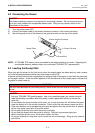
5.4 Adjusting the Paper Near End Sensor Position
5- 4
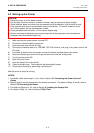
1) Turn the printer power ON.
2) Press down the ejector to unhook the printer cover. (
c
)
3) Hold both sides of the printer cover and open it until it stops.(
d
)
4) Check for the correct orientation of the receipt roll, and put it into the paper holder.
5) Pull the receipt until it extends past the paper outlet for about 5 cm (
e
), and then close the printer
cover by pressing it’s front centre gently and make sure that the ejector snaps up.
6) Excessive paper will be automatically fed and cut.
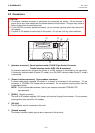
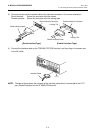
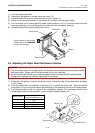
5.4 Adjusting the Paper Near End Sensor Position
1) Press down the ejector to unhook the printer cover. Hold both sides of the printer cover and open
it until it stops.
2) Push the sensor tab in the direction of the arrow (
c
) to unhook the sensor tab. Adjust the sensor
unit position (
d
) by moving the sensor tab according to the remaining volume of the receipt paper.
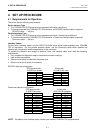
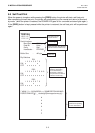
3) The following table shows an outline of the relationship between the remaining volume of the
receipt paper and the sensor position. (when using the specified paper roll)
Sensor position
Remaining volume
(Outer roll diameter: mm)
1
∅
18
2
∅
21
3
∅
24
4
∅
27
2
3
1
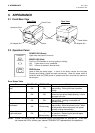
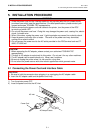
Print Head
Printer Cover
Ejector
Caution symbol for hot surface.
(Please refer to the
WARNING!
on the previous page.)
CAUTION!
1. The remaining volume of roll paper (outer roll diameter) varies depending on the printer model
s
and paper types. Please use the following table just for your reference.
2. Do not open the DIP switch cover under the paper holder or change the DIP switch settings.
Changing the settings may cause a malfunction of the printer.
1234
2
1
Sensor Tab
Sensor Unit
DIP Switch Cover
Sensor Position
Receipt Roll