


12
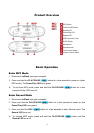
4. Press and hold the REC button for a few seconds to enter Record mode. The
Record LED turns red.
5. Press the REC button. The Record LED blinks red and voice recording starts.
6. Press the REC button to stop voice recording when you wish to stop.
7. Press the REC button to start voice recording when you wish to start again.
The recorded files (VXXX.WAV format) are saved on the folder “Voice”, in an
ascending order.
With sufficient power: 128MB memory can store up to 9 hours of recorded voice.
256MB memory can store up to 18 hours of recorded voice.
512MB memory can store up to 36 hours of recorded voice.
To achieve better quality recording, please keep voice source close to the microphone
of JetFlash.
If JetFlash is full and there is no memory available for voice recording, the
Power/PLAY LED turns on. To make memory available for voice recording, delete
some files or folders from JetFlash.
To resume MP3 mode, press and hold PLAY/PAUSE button until the Record
LED turns off.
To Play the Recorded Files
1. Disconnect JetFlash from your computer.
2. Set HOLD switch to “OFF” position.
3. Press and hold the PLAY/PAUSE button for a few seconds to power on (enter
MP3 mode). The Power/Play LED turns green.
4. Press and hold the REC button for a few seconds to enter Record mode. The
Record LED turns red.
5. Press the PLAY/PAUSE button to play the recorded files. The Power/Play
LED blinks green.
To resume MP3 mode, press and hold PLAY/PAUSE button until the Record
LED turns off.
To power off, press and hold the PLAY/PAUSE button until the Power/Play
LED turns off.
For more operating instructions, please refer to Basic Operation.