


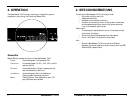


StackMaster™ TX12 100BASE-TX 12-Port Stackable Hub
6
9
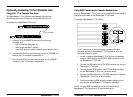
Installing StackMaster TX12 in 19-inch Rack
NOTE: Optionally, the StackMaster TX12 can be installed on a table or
other flat, stable surface.
NOTE: The StackMaster TX12 is shipped with attached brackets for
standard 19-inch rack installation. Rackmount screws and clip nuts are
NOT provided.
To install the StackMaster TX12 in 19-inch rack:
1. Locate four (4) screws (and clip nuts, if necessary) for each
StackMaster TX12 to be installed.
2. Carefully align the StackMaster TX12 between the 19-inch rack
mounting rails at the installation position.
3. Install two screws through right front bracket and two screws
through left front bracket, using clip nuts if necessary.
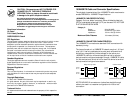
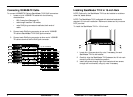
Connecting 100BASE-TX Cable
To connect 100BASE-TX Cable to StackMaster TX12 RJ-45 connectors:
1. Locate or build 100BASE-TX cables with the following
characteristics:
• 803.2 compliant (See page 15)
• cable length less than 100 meters
• male RJ-45 plug connectors installed at both ends of
cable.
2. Connect male RJ-45 plug connector at one end of 100BASE-
TX cable to StackMaster TX12 RJ-45 jack connector.
3. Connect male RJ-45 plug connector at other end of 100BASE-
TX cable to terminal device RJ-45 jack connector.
Up to 100 meters