


Using Printer Menus
3
Using Printer Menus
You need to know how to use printer menus to change printer settings. The
printer menus are directories of printer features. Menus are organized into
three levels, which correspond to these printer buttons:
GROUP
,
ITEM
, and
SET
.
Use the buttons on the front panel of the printer to change printer settings as
shown in the table below.
The
GROUP
,
ITEM
,
SET
,
EXIT
, and
PRINT
buttons must be activated before you
can use them. To activate these buttons, press
PRINT
QUALITY
and
CHARACTER
PITCH
on the front printer panel at the same time. Menu Mode prints on the
printer paper indicating the buttons are activated.
The
CHARACTER
PITCH
button, which is used to change the characters per inch
(CPI), is ready for use and does not require activation.
For an example of how to change a printer setting, see “Changing Printer
Settings” on page 4.
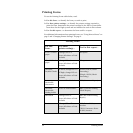
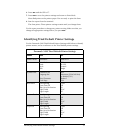
Payroll Checks Leave at Triad defaults If DX10, PRM #4 (Payment
Processing)
If Eagle, PPTU (Payment
Processing)
Price Labels Leave at Triad defaults RLA (Price Label Printing
Report)
W-2 Forms Change LPI to 8
Leave all others at Triad
defaults
If DX10, PRM #10 (Print
Year-End W-2 Forms)
If Eagle, RPW2 (Print Year-
End W-2 Forms)
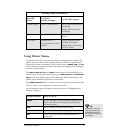
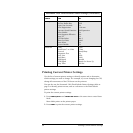
Printer Button How to use it...
GROUP
Press repeatedly to cycle through the groups in the
menu. Stop when the setting you want prints on
the printer paper.
ITEM
Press to change an item within a group.
SET
Press to change an item setting.
EXIT
Press to save the printer settings and return to
print mode.
Printing Forms (
continued
)
For this
form...
Use these
printer settings...
Use for this report...
If you skip a menu set-
ting, keep pressing the
appropriate menu but-
ton to cycle through the
menu again.
Tip