


2
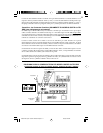
• PROTECTED (Green Indicator Light) (ALL MODELS)
Indicates the surge suppression components are intact and providing full protection against
spikes and surges. This LED should be illuminated anytime the power switch is turned
ON. If the Protected LED does not illuminate, then some of the surge suppression compo-
nents are not functioning, and the unit should be returned for repair. You may still use the
unit. However, connected equipment will be protected from spikes and surges at a lesser
level than normal.
• LOW VOLTAGE (Amber Indicator Light) (SUPER 10+TEL DELUXE ONLY)
Indicates the presence of abnormally low voltage which may cause computer lockups or
data errors. If the light remains constantly on, you are receiving chronically poor power
from your outlet. You should either try connecting your Surge Suppressor to another
outlet on a separate circuit, unplugging power-hungry devices on the same circuit or con-
sider purchasing a line conditioner or a line-interactive UPS system to automatically boost
your voltage to acceptable levels.
Integrated Receptacle Covers
Slide cover-switch, built into each of the Surge Suppressor's receptacles, to safely cover it.
WARNING!
RISK OF ELECTRICAL SHOCK
DO NOT insert any object into the receptacles when sliding the Receptacle Covers.
CONNECTING YOUR SURGE SUPPRESSOR TO AC POWER
The Surge Suppressor power cord should only be connected to a standard 3-wire grounded 120-
Volt AC outlet.
WARNING!
DO NOT connect to an ungrounded AC outlet. DO NOT connect to 2-wire extension
cords or adapters. Lack of a proper ground connection will eliminate common-mode
protection and cause small leakage potential on the case. However, you can plug 2-wire
devices into any of the surge suppressor’s outlets. DO NOT drill into any part of the
housing. DO NOT open, as there are no user-serviceable parts inside.
CONNECTING YOUR EQUIPMENT TO YOUR SURGE SUPPRESSOR
Connection to AC Outlets
After you have properly connected your Surge Suppressor to the AC line, you can connect the AC
power cords of your equipment to the Surge Suppressor. DO NOT OVERLOAD the Surge Suppressor.
Outlet Load Capacities: 2 outlets marked “UNSWITCHED” (12 amps total); 8 unmarked outlets (15
amps total).
Connection to RJ11 Telephone Line Jacks
All Surge Suppressors feature two female RJ-style phone jacks that accept standard male RJ-
style plugs. (Super 10+TEL DBS protects a single telephone line. Super 10+TEL Deluxe and
Super 10+TEL protect two telephone lines* simultaneously). The Surge Suppressor must al-
ways be the first item connected in line from the telephone wall jack. The Surge Suppressor
must always be plugged into a 3-wire grounded outlet for the telephone protection to work.
* If you have two phone lines to protect that do not both travel through a single phone cable, the use of "Y" splitters appropriate to
your application will be necessary.
Connect the phone cord from the wall jack directly to the Surge Suppressor phone jack labelled
"LINE" (or "IN"). Connect the phone cord from the device to be protected directly to the phone
jack labelled "EQUIP" (or "OUT"). The connected equipment is now protected against spikes,
surges and line noise on the telephone line.
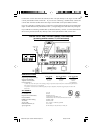
Connection to Coaxial Cable Jacks (SUPER 10+TEL DBS ONLY) (see diagram)
Super 10+TEL DBS features 4 gold-plated "F" style coaxial connectors that accept standard coaxial
cables with male "F" style plugs. The Super 10+TEL DBS must always be the first item connected
in line from the coaxial wall jack. The Super 10+TEL DBS must always be plugged into a 3-wire
grounded outlet for the coaxial protection to work.
200007140 Super 10 Series OM 93-1848.p65 8/4/00, 3:27 PM2