


2
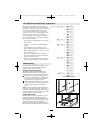
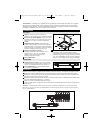
1. Handle: Pull to slide the module out; push to
slide the module in.
2. LCD Monitor: After sliding the module out,
flip up the cover to access the LCD monitor,
keyboard and touch pad.
3. Keyboard
4. Slide Release: Mechanism to lock the drawer
when the console is not in use, preventing it from
accidentally sliding open. To slide the the console
out, you must first release it by moving this tab
sideways.
6. Rackmounting Brackets: The brackets secure the
chassis to a standard 19-inch rack or rack enclosure.
See the next page for rackmounting details.
7. Touch Pad
8. Console and LCD Controls: The controls located
here include the console power on/off button, and
the buttons used to control the position and picture
setting of the LCD display. See “LCD OSD (On-
Screen Display) Configuration,” on the next page,
for details.
Introduction
Front View
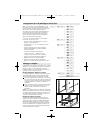
Rear View
1. Console Port Section: The KVM cable kit
(included) to connect the console to your server or
KVM switch plugs in here.
2. Power Socket: The AC power cord plugs in here.
1
2
3
4
5
6
7
1
2
3
4
5
6
7
1
2
1
2
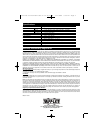
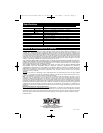
Refer to the example installation diagram below as you perform the following steps:
1. Plug the cable kit (provided with this unit) into the console ports on the B021-000-17.
2. Plug the keyboard, monitor, and mouse connectors on the other end of the cable kit into their respective
ports on the server or KVM.
3. Connect the power cord to the B021-000-17’s power socket and plug the other end into a compatible AC
power source.
4. Power up the connected server or KVM.
5. Turn on the B021-000-17 by pressing the power on/off button (located just below the left side of the LCD monitor).
Installation
1
2
3
4
5
1
2
3
Note: The example diagram below shows the B021-000-17 connecting to a B022-016 KVM switch. If you are
connecting to a different model, the console port connectors may be in a different location.
Warning: Use of this equipment in life support applications where failure of this equipment can reasonably be
expected to cause the failure of the life support equipment or to significantly affect its safety or effectiveness is
not recommended. Do not use this equipment in the presence of a flammable anesthetic mixture with air,
oxygen or nitrous oxide.
5
200711182 93-2754 B021-000-17-19 OM_2.qxd 1/17/2008 3:00 PM Page 2