


2 CD-ROM Box Enclosure Installation Guide
1-1.1 CD-ROM Box Enclosure Features
• Enables portable use of 5.25” internal model removable media devices with
computers equipped with the same interface
• Supports hot-swap and plug-and-play features of the selected interface
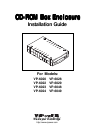
• Model VP-6020: enables cross-platform interface compatibility of 5.25”
form factor IDE/ATA/ATA devices and ATAPI CD-ROM drives with
computers using the same interface as the Docking Kit model (USB,
Parallel, 1394/FireWire, SCSI, CARDBUS and PCMCIA).
1-1.2 Unpacking Your CD-ROM Box
Verify that the following items are included in the carton. If any parts are damaged or
missing, please contact your local dealer or sales representative immediately.
• One assembled CD-ROM Box Enclosure
• One vertical-holder stand (for optional use)
• Four mounting screws
• Installation Guide
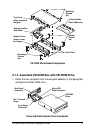
2-1 Installation
The following sections will guide you through the installation of a CD-ROM drive
in the CD-ROM Box Enclosure. There are two parts to the installation:
• Disassembly of the CD-ROM Box Enclosure (as it is shipped)
• Assembly of a device in the CD-ROM Box Enclosure
A small Phillips screwdriver is the only tool required.
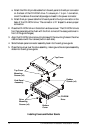
2-1.1 Disassemble the CD-ROM Box
1. Remove the four rubber stands on the CD-ROM Box Enclosure by gently
prying them off.
2. Remove the four retaining screws securing the top enclosure cover.
(Refer to the following illustration to identify the top cover.)
3. Separate the top and bottom enclosure covers.
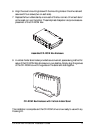
4. Slide out the end-panel with mounted connectors and fan .
Note that the CD-ROM Box Enclosure is factory
assembled with the drive rails installed.