


ADVANCED FEATURES
Page 111
Contents
Index
•
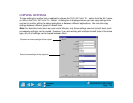
To Fit.
Maps the selected tablet area to the selected screen area. The scale and the vertical and
horizontal proportions are not maintained. To set the scale, click the S
CALE... button. In the SET
S
CALE FACTOR dialog box, enter values to define the tablet to screen ratios for the x and y axes.
The ratio between x- and y-scale factor indicates how much a traced image will be distorted by the
mapping relationship between tablet and screen. For example, an x-scale factor of 2 makes two
inches on the tablet’s x axis equal to one inch on the screen’s x axis. A y-scale factor of 3 makes
three inches on the tablet’s y axis equal to one inch on the screen’s y axis.
•
Mouse Mode.
Sets the area to position the screen cursor in Mouse Mode.
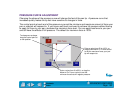
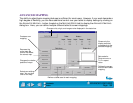
5. Define the size of the display area by dragging the handles of the selected display area. Then click
and drag the display area to the desired position. For more precise control in selecting the display
area, click the S
ET DISPLAY... button to access the Portion of Display dialog box. There, you can define
the display area in a variety of ways.
6. To create additional tablet mappings, click on the A
DD MAPPING button. A new mapping is created with
the entire tablet area mapped to the entire display area. Repeat the above steps to size and position
the tablet and display areas for each mapping you add.
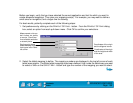
If you define overlapping tablet areas, the tablet area with a lower number will always be above (in front
of) the areas with a higher number and will have precedence for positioning the pointer on the screen.
Use the B
RING TO FRONT and SEND TO REAR buttons to change the relative positions of the maps.
For example, if you have created multiple mappings, S
END TO REAR will move a selected mapping to
the “bottom” of the stack.