


MY BOOK STUDIO EDITION II
USER MANUAL
REPLACING A DRIVE – 28
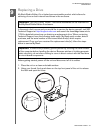
3. Loosen the thumbscrew that secures the drive cover plate. Remove the drive
cover plate and set aside.
Note: Each drive is designated A or B by a color coded decal.
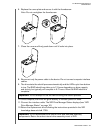
4. Locate the drive you wish to replace (A or B). Using the pulltab, carefully and
slowly pull the drive assembly up and out of the enclosure and set aside.
5. Gently slide the replacement drive assembly into the drive slot until is fully
inserted.