


dropout. The amount of clamping force is controlled by the tension adjusting nut. Turning the tension adjusting
nut clockwise while keeping the open cam lever from rotating increases clamping force; turning it counter-
clockwise while keeping the open cam lever from rotating reduces clamping force. Less than half a turn of the
tension adjusting nut can make the difference between safe clamping force and unsafe clamping force.
WARNING: The full force of the cam action is needed to clamp the wheel securely. Holding the nut
with one hand and turning the lever like a wing nut with the other hand until everything is as tight as
you can get it will not clamp a cam action wheel safely in the dropouts.
b. Installing a WTB Front Wheel with over-center cam action quick release
CAUTION: Be careful not to damage the disc, caliper or brake pads when re-inserting the disc into
the caliper. Never activate a disc brake’s control lever unless the disc is correctly inserted in the
caliper.
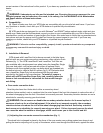
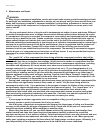
(1) Move the cam lever so that it curves away from the wheel (fig.1). This is the OPEN position.
(2) With the steering fork facing forward, insert the wheel between the fork blades so that the axle seats
firmly at the top of the fork dropouts. The cam lever should be on rider’s left side of the bicycle (fig. 1).
(3) Holding the cam lever in the ADJUST position with your right hand, tighten the tension adjusting nut with
your left hand until it is finger tight against the fork dropout (fig. 1).
(4) While pushing the wheel firmly to the top of the slots in the fork dropouts, and at the same time centering
the wheel rim in the fork, move the cam lever upwards and swing it into the CLOSED position (fig. 1). The lever
should now be parallel to the fork blade and curved toward the wheel. To apply enough clamping force, you
should have to wrap your fingers around the fork blade for leverage, and the lever should leave a clear imprint
in the palm of your hand.
NOTE: If the lever cannot be pushed all the way to a position parallel to the fork blade, return the lever to the
OPEN position. Then turn the tension adjusting nut counterclockwise one-quarter turn and try tightening the
lever again.
WARNING:
Securely clamping the wheel with a cam action retention device takes considerable
force. If you can fully close the cam lever without wrapping your fingers around the fork blade for
leverage, the lever does not leave a clear imprint in the palm of your hand, and the serrations on the
wheel fastener do not emboss the surfaces of the dropouts, the tension is insufficient. Open the lever;
turn the tension adjusting nut clockwise a quarter turn; then try again.
(5) Spin the wheel to make sure that it is centered in the frame and clears the brake pads; then squeeze the
brake lever and make sure that the brakes are operating correctly.
c. Removing a WTB Front Wheel with over-center cam action quick release
CAUTION: Disc rotors have sharp edges, and both rotor and caliper can get very hot during use.
Exercise care in touching the rotor or caliper.
(1) Move the cam lever from the locked or CLOSED position to the OPEN position (fig. 1).
(2) Loosen the tension adjusting nut enough to allow removing the wheel from the fork dropouts. You may