


4. Adjusting the bearings
The LaserDisc Lite front hubs do not need adjustment. There is a small amount of play in the axle when the hub is
not clamped in the fork, and this is normal. When the quick release is closed, the axle system will compress slightly and
eliminate the play.
LaserDisc Lite rear hubs for Model Years 2001-2008 are adjustable while on the bike. Newer ones are not
adjustable. While holding the Adjuster Nut (10) with a 19mm wrench, loosen the Lock Nut (11) with a second 19mm
wrench. Turn the Adjuster Nut clockwise to eliminate play. If the Adjuster Nut bottoms out before play is eliminated, you
have a newer, non-adjustable hub. While holding the End Cap (12) in place, tighten the Lock Nut back down against the
Adjuster Nut. If the Adjuster Nut does not bottom out, you have an older, adjustable hub. Adjust the Adjuster Nut and,
holding the End Cap (12) in place, tighten the Lock Nut back down against the Adjuster Nut. Take care though to adjust
the hub so that there is just enough load on the bearing to remove play. Over-tightening will cause the bearing to over-
load, and they can wear out prematurely.
SE5-0608-1
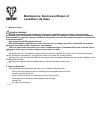
5. Disassembling the hubs
For the front hub, remove the skewer and pull the End Caps (3) out of the hub. The “O” Ring (3) and Dust Seal (5)
should stay on the end cap and pull off with it. This will expose the Cartridge Bearings (4). Floating between the bearings
is a hollow tube, the Front Axle (sleeve) (2) that acts as the axle. Push the Front Axle to the side with a drift punch or a
small screwdriver, so that the opposite inner bearing race is visible through the bearing. Carefully, using a small flat end
drift punch, tap on the inner bearing race. This will drive out the bearing. You can then remove the opposite bearing in the
same way.
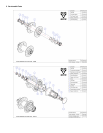
For the rear hub, grasp the drive side of the Axle (3) in an axle vise. Much like a conventional hub, on the non-drive
side there is a Lock Nut (11) and an Adjuster Nut (10), which runs against the Bearing (4), with the addition of a pressed-
in End Cap (12). With two 19mm wrenches you will be able to loosen the Lock Nut and Adjuster Nut. Threading them off
the end will force the End Cap up and out of the axle.
Now, the Hub Shell (1) and Freehub Body (2) can be removed from the Axle. They are separate pieces, held together
by the Axle, so you will be able to separate them. Pieces shouldn't go flying as they are separated, though be careful to
not drop any of the Pawls (7) or the axle Washer (6), which may be loose. Now you will be able to access any of the
internal parts of the hub.
When re-assembling the hub, put the large Dust Seal (9) on last, and pay special attention to the rubber Dust Seal (5)
placement on the Adjuster Nut (10) and drive-side End Cap (3).
SE6-0608-1
6. Replacing the front hub and rear hub bearings
On the rear hubs, the Bearings have a light press-fit. So, once the hubs are disassembled, the Bearings can be
lightly tapped or pressed out. Follow the directions above for taking your hub apart, and from there you will be able to
access the 2 Bearings in the Hub Shell and the 2 Bearings in the Freehub Body. Tap out the old Bearings as described in
the front hub disassembly instructions above, then carefully tap or press the new Bearings back into place.
On the front hubs, slide an End Cap into one Bearing and position it in one end of the Hub Shell. Tap the Bearing
into place in the Hub Shell so it is flush with the face of the Hub Shell; then place the Axle (sleeve) in the Hub Shell and on
to the End Cap which is in the Bearing. Position the other Bearing and, with the second End Cap in place, tap it into the
Hub Shell, making sure that the Axle (sleeve) remains centered so that the “O” ring end of the End Cap can seat in the
Axle (sleeve). Place the hub into your frame and check for binding with the QR skewer fully tightened. You should now be
done.
SE7-0608-1
7. Contact Information
If you have any questions or problems with any WTB product, please go to wtb.com for help.
GI7-0508-1
8. Disclaimer
The original English language version/meaning of these instructions supercedes all translations. WTB is not
responsible for any errors in translation of these or any product instructions.
GI8-0508-1
© Copyright WTB September 2008