- 3 -
INSTRUCTIONS
1 Connect the supplied cables from the HDTV HDMI sources into the 4x1 HDMI Switcher
inputs.
2 Connect the cables from your display (monitor or projector) into the HDMI out of the 4x1 HDMI
Switcher.
3 Plug the 5VDC power supply into the 4x1 HDMI Switcher.
* Adjust the EQ knob to remove signal noise resulting from longer input cables
How to Control the 4x1 HDMI Switcher
Use the RMT4-IR remote control to toggle between sources.
RMT4-IR INSTRUCTIONS
1. Remove battery cover from the back of the RMT4-IR remote.
2. Verify that dip switches 1 & 2 are in the down (OFF) position.
3. Insert the battery, hold the battery so that you can see the positive side facing up. The side that is
not marked must be facing down.
4. Test the RMT4-IR remote by pressing ONLY one button at a time. The indicator light on the remote
will flash once each time you press a button. WARNING: Do not press multiple buttons
simultaneously and do NOT press buttons rapidly. These actions will cause the remote to reset and
steps 1-4 will have to be repeated.
Note: The RMT4-IR ships with two batteries. One battery is required for operation, the second battery
is complimentary.
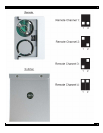
The optional IR extender allows you to relocate your HDMI Switcher and still have IR control of the
HDMI Switcher
IREXTENDER
1 Plug the IR extender into the Remote port on the front of the Switcher Unit
2 Flip the Dip Switch 1 underneath the unit to the ON position
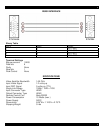
RMT4-IR CODE CONFLICTS
There are matching pairs of dip switches underneath the Switcher unit and under the
remote battery cover. Switch 1 & 2 on the Remote and Switch 1 & 2 underneath the unit
are the matching switches. These switches need to be matched for the remote to
communicate with the switcher. There are 4 possible sets of IR codes and at least one of
these sets should be able to resolve any IR conflicts with other home theater devices.