


Installation Guide
10
©2002 Xantrex Technology Inc. All Rights Reserved
P/N 973-0019-01-02 Rev A 06/2002
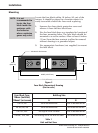
Fuse Replacement
Before replacing the fuse, determine and correct the
cause of the overcurrent condition.
1. Use a hex socket and remove the two nuts (and split
washers) securing the fuse. Note the hardware
installed and the order of how it is stacked. This is
important to prevent excess heat which can cause
the fuse to open again.
2. Remove the open fuse and replace it with a known
good one.
3. Reinstall the hardware as it was originally stacked on
the fuse.
4. Tighten the hex nuts securing the fuse to
10-15 ft/lbs.
5. Double-check the battery cable connections and
verify all connections are properly tightened .
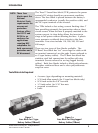
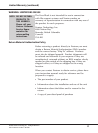
Figure 6
Remove the Two Nuts and Washers and Replace Fuse
Care and Maintenance
WARNING:
BEFORE
REPLACING
THE FUSE,
DISCONNECT ALL
POWER SOURCES
AND TURN OFF
ALL LOADS.
NOTE: If the system
also contains a
DC disconnect,
switch it to OFF
before replacing
the fuse.
NOTE: Fuses are NOT
covered under the
limited warranty.
FUSE CLASS T
300 AMP
FUSE CLASS T
300 AMP
bolt
split-washer
hex nut
fuse
bolt
split-washer
hex nut
bolt
split-washer
hex nut
fuse
bolt
split-washer
hex nut