


Stock Management and Calibration
Color Management Guide 3-11
Custom and Colored Stock hints
It is recommended that you place all your stocks, including new
or custom stocks, in one of the three pre-existing color groups.
This limits the need for calibration to three groups of halftones.
It may be useful to place all colored stocks into a single group.
Since all colored stock by definition will have a lower white point
than L* 93.7, the non-white stocks are expected to be placed in
the Other color group. However, you may prefer the results you
achieve using white or bright white profiles on the non-white
stock.
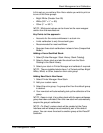
A simple way to determine which color group would be best for
your specific colored stock is:
1. Add your stock to a tray.
2. If desired, within [Printer Manager: Trays], select the option to
force feed from the tray. Alternatively, you can just program a
specific stock for your job.
NOTE: The option to force feed from a tray is not available
on the iGen3.
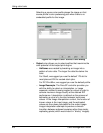
3. Submit a job to a hold queue on the controller. The job should
contain a variety of image types, i.e. photos, halftones, and
graphics, as well as text. You should be familiar with how this
job prints on white coated or uncoated stock.
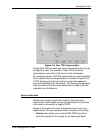
4. Open properties for the job within Job Manager.
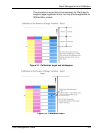
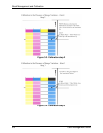
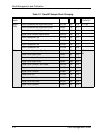
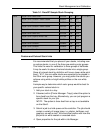
Other Digital Color Gloss Cover 3r11333 210 93.7 (L* <= 93.7)
Digital Color Colotech+ Gloss Coated 3r95224 120 93.7
Digital Color Colotech+ 3r97098 280 93.7
Digital Color Colotech+ Gloss Coated 3r97163 280 93.6
Digital Color Colotech+ 3r94668 220 93.5
Digital Color Gloss Text 3r11336 140 93.4
Digital Color Graphics White Fiber 3r11166 105 93.4
Digital Color Colotech+ 3r94661 200 93.3
Digital Color Colotech+ 3r94646 100 93.3
Digital Color Colotech+ 3r94656 160 93.3
Digital Color Gloss Text 3r11330 120 93.2
Table 3-1. DocuSP Sample Stock Grouping