


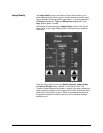


50 •Making copies XEROX WIDE FORMAT COPY SYSTEM
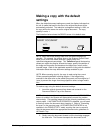
Making a copy with the default
settings
When the default document settings are used, the display indicates that
the roll of media that best fits the size of the original document will be
automatically selected. The reduction/ enlargement setting is 100%, so
the copy will be the same size as the original document. The copy
quantity is set to 1.
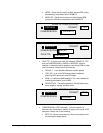
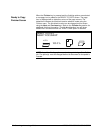
The illustration below shows the READY screen in its default state.
READY TO COPY
INSERT DOCUMENT
100.0%
AUTO
1
NOTE: Many document settings other than the default settings are
possible. For example, the options keys on the Scanner Control Panel
allow you to control the media selection, image quality and
reduction/enlargement percentage. The Transform special features key
allows you adjust the margins around the image, specify the position of
the image on the media, and transform the image into a mirror and/or
inverted image. Refer to the applicable sections of this guide for detailed
information about the many document settings available to you.
NOTE: When scanning to print, the copy is made using the current
Printer processing defaults including margins. If the image being
scanned is the same size as the media being used, set the margins to 0
(zero) to prevent the image from bieng clipped or select a larger media
size.
To make a copy using the default document settings:
1. Insert the original document face down and centered on the
Document Feed-in Tray of the Scanner.
NOTE: If the document is not exactly centered and the AUTOCENTER
feature is enabled, the Scanner will automatically correct the problem
electronically. The resulting image will still be correctly positioned on the
output media. If AUTOWIDTH/AUTOCENTER is disabled, you will need
to carefully center the document when inserting it. Refer to "Controlling
the scan" on the previous page. AUTOWIDTH/AUTOCENTER is not
available in the PRODUCTIVITY mode, requiring the user to manually
align the document within the appropriate document size guidelines on
the Feed-in Tray.
2. Gently move the document forward until the lead edge engages
the feed rolls. The Scanner transports the document to the