


Page 5
Part number: 45022476
3. Under Check Print Settings, choose the desired calibration set.
4. If there is more than one option, choose the appropriate calibration set for the type of
media you will use most often.
N
OTE
:
For this calibration to take effect, the calibration set must be associated with one or
more output profiles. The default calibration set is already associated with the default
output profile, so there is no need to make any new associations.
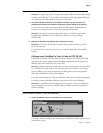
5. Under Generate Measurement Page, click Print.
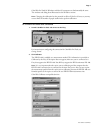
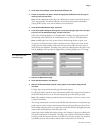
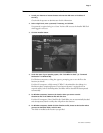
6. In the Print Options dialog box that appears, choose the page type, paper size, and input
tray to use for the measurement page, and then click Print.
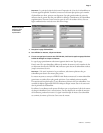
Select either 34 Sorted Patches or 21 Sorted Patches. The Paper Size pop-up menu will
automatically select LTR/A4 for 21 Sorted Patches or 11
x
17/A3 for 34 Sorted Patches.
N
OTE
:
Available paper size is the primary factor in determining whether to print 34 or
21 patches. Choosing the larger number of patches to print will give you a more precise
reading, because more patches provide more reference points within the tonal range on
which to base the calibration. Generally, more patches are added between the quarter tone
and the highlight, which provides for slightly better rendering of light tones in an image.
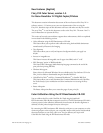
7. Retrieve the Measurement Page.
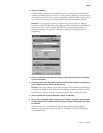
8. Under Get Measurements, click Measure.
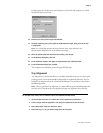
9. With the EFI ED-100 method selected, choose options in the options dialog box and
click Start.
For Page Type, the previously selected page information appears.
For Clicks Per Patch, select how many measurements (clicks of the measurement button on
the EFI ED-100) you want to use for each color patch, up to three clicks per patch.
N
OTE
:
Select multiple clicks per patch when the printed output is uneven to ensure a more
accurate measurement.
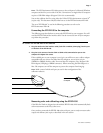
The average measurement is returned to the EFI ED-100. More than one measurement per
patch results in a more accurate measurement of that patch, but it takes more time. If you
select multiple clicks per patch, it is a good idea to move the EFI ED-100 slightly after each
measurement while keeping it within the patch circle.
Selecting the Audio Feedback check box instructs the computer to signal you audibly after
each patch measurement is completed. This allows you to take the measurements without
having to watch the computer monitor. An audible tone indicates the patch was measured
successfully; the same tone sounds to indicate that a measurement error occurred.
Print Options dialog boxes
for 21-patch and 34-patch
measurement pages