


Installing Printer Software in Windows
3
1 Installing Printer
Software in Windows
This chapter includes:
• Installing Printer Software
• Reinstalling Printer Software
•Removing Printer Software
Installing Printer Software
All applications should be closed on your PC before beginning
installation.
N
OTE
: If the “New Hardware Wizard” window appears during
the installation procedure, click in the upper right corner of
the box to close the window, or click
Cancel
.
1
Insert the supplied CD-ROM into your CD-ROM drive.
The CD-ROM should automatically run and an installation
window appears.
If the installation window does not appear, click
Start
and
then
Run
. Type
X:\Setup.exe
, replacing “
X
” with the
letter which represents your drive and click
OK
.
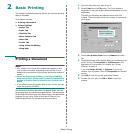
2
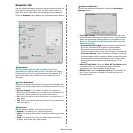
Choose the type of installation.
•
Install Printer Driver
: Installs the software for your
printer.
•
User Guide
: Allows you to view the User Guide. If your
computer doesn’t have Adobe Acrobat, click on this
option and it will automatically install Adobe Acrobat
Reader for you.
•
Install Acrobat Reader
: If your computer doesn’t have
Adobe Acrobat, click on this option and it will
automatically install Adobe Acrobat Reader for you.
•
Change Language
: Allows you to choose the language
of the software you want to install.
3
Follow the instructions on the screen to complete the
installation.
N
OTE
: If your printer driver doesn’t work properly, reinstall
the printer driver.
Reinstalling Printer Software
You can reinstall the software if installation fails.
1
Start Windows.
2
From the
Start
menu select
Programs
or
All Programs
→
your printer driver name
→
Maintenance
.
Or place the CD-ROM into the CD-ROM drive.
3
Select
Repair
.
4
When the reinstallation is done, click
Finish
.
Removing Printer Software
1
Start Windows.
2
From the
Start
menu select
Programs
or
All Programs
→
your printer driver name
→
Maintenance
.
Or place the CD-ROM into the CD-ROM drive.
3
Select
Remove
.
4
After the software is removed, click
Finish
.