


USER’S MANUAL OF X-Micro WLAN 11b ACCESS POINT Version: 2.0
2 Installation
2.1 Hardware Installation
Step One: Place X-Micro WLAN 11b Access Point to the best optimum transmission
location.
The best transmission location for your X-Micro WLAN 11b Access Point is
usually at the geographic center of your wireless network, with line of sign to all of
your mobile stations.
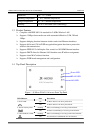
Step Two: Connect X-Micro WLAN 11b Access Point to your wired network.
Connect X-Micro WLAN 11b Access Point by category 5 Ethernet cable to your
switch/ hub/ router/ xDSL modem or cable modem. A straight-through Ethernet
cable with appropriate cable length is needed.
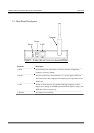
Step Three: Supply DC power to X-Micro WLAN 11b Access Point.
Use only the AC/DC power adapter supplied with X-Micro WLAN 11b Access
Point; it may occur damage by using a different type of power adapter.
The hardware installation finished.
2.2 Software Installation
¾ There are no software drivers, patches or utilities installation needed, but only the
configuration setting. Please refer to chapter 3 for software configuration.
4