1. Definition of each field
a. SSID:
Name of BSS or IBSS network
b. BSSID:
MAC address of AP or randomly generated of IBSS
c. Signal:
Receive signal strength of specified network
d. Channel:
Channel in use
e. Encryption:
Encryption algorithm used in BSS or IBSS. Valid value includes WEP, TKIP,
AES, and None
f. Authentication:
Authentication mode used in the network, including Unknown,
WPA-PSK, WPA2-PSK, WPA and WPA2
g. Network Type:
Network type in use, Infrastructure for BSS, Ad-Hoc for IBSS network
2. Connected network:
a.
When RaConfig first run, it will select the best AP to connect automatically
b.
If user wants to connect to other AP, just double click on the intended AP to make
connection
c.
If the intended network has encryption “Not Use”, RaConfig will bring up the security
page and let user input the appropriate information to make the connection. Please refer
to Chapter 4 to see how to fill the security information.
This icon indicates the change is successful.
3.
Indicate connection status, the connected network’s SSID will show up here
4.
Issue a rescan command to update information on surrounding wireless network
5.
Connect to the selected network
6.
Add the selected AP to Profile setting. It will bring up profile page and save user’s setting to
a new profile.
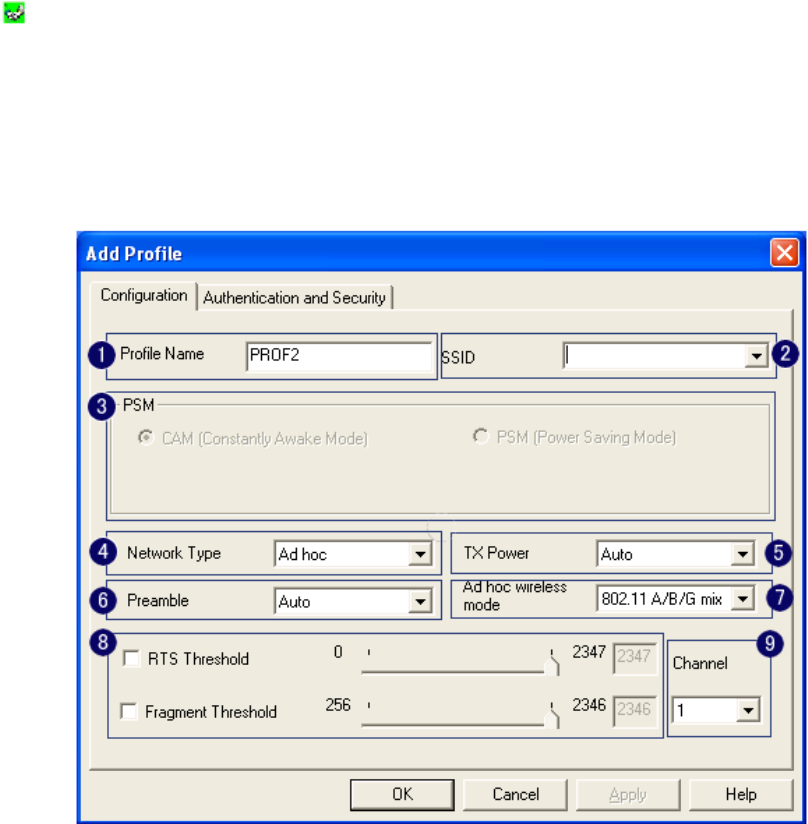
3.3.1 ADD/EDIT Profile
a. Configuration:
Figure 3-4
1. Profile Name:
User chose name for this profile
2. SSID:
User can key in the intended SSID name or use pull down menu to select from
available APs
3. Power Save Mode:
Choose from CAM (Constantly Awake Mode) or Power Saving Mode.
There is a check box for AC power when CAM is checked, the wireless LAN card will stay
full power when AC power cord is plug into power outlet
4. Network Type:
There are two types, Infrastructure and Ad-hoc. Under Ad-hoc mode,
user can also choose the preamble type. In addition to that, the channel and Ad hoc
13


