


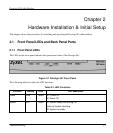


Prestige 941 Cable Modem
Troubleshooting 2-3
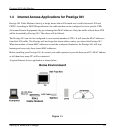
Locate the coaxial cable at the installation site and move the cable end, or install a two-way splitter as
necessary, to provide a connection near the Prestige 941 cable modem router location.
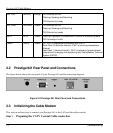
Step 2. Connecting the Prestige to the Cable System
Connect the Prestige 941 to cable port on the cable modem using F-type connector.
(If the quality or general condition of the coaxial cable at the installation site is in question, we
recommended that you replace the coaxial cable).The cable port on the cable modem is labeled "CABLE”.
Step 3. Connecting Ethernet Cables to the Prestige 941
If you have more than one PC, you must use an external hub. Connect the 10/100M LAN port on the
Prestige to a port on the hub using a cross-over Ethernet cable. If you only have one PC, you can connect
the Prestige to the PC directly without a hub. For a single PC, connect the 10/100M LAN port on the
Prestige to the Network Adapter on the PC using a straight through cable.
Step 4. Connecting the Prestige 941 to the Computer(s)
Locate the unconnected end of the Ethernet cable that you just connected to the Prestige 941 and connect
this end to the Ethernet port on the personal computer.
Step 5. Connecting the Power Adapter to your Prestige
Connect the power adapter to the port labeled POWER on the rear panel of your Prestige.
Step 6. Cable Modem Initialization
Power on the Prestige 941 cable modem. It will initialize the system and start to connect with Headend
CMTS. After the RDY light becomes solid, the P941 is ready to transfer data traffic.
Note: For P941 Cable Modem, you need not connect the console port to the PC. No configuration is
required on your part through the console port. You can plug and play.