14
© 2001 Directed Electronics, Inc.
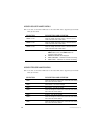
MONITOR SPECIFICATIONS
RVM 560
Screen size 5.6"
Resolution 74,880 pixels
View angle Top 10 degrees
Bottom 30 degrees
Left 45 degrees
Right 45 degrees
Video system ntsc/pal
Osd language English
Power requirements 10 - 15 vdc
Operating temp. 35 - 115 degrees
fahrenheit
RVM 680
Screen size 6.8"
Resolution 89,856 pixels
View angle Top 10 degrees
Bottom 30 degrees
Left 45 degrees
Right 45 degrees
Video system ntsc/pal
Osd language English
Power requirements 10 - 15 vdc
Operating temp. 35 - 115 degrees
fahrenheit
RVM 700
Screen size 7.0"
Resolution 112,320 pixels
View angle Top 60 degrees
Bottom 30 degrees
Left 60 degrees
Right 60 degrees
Video system ntsc/pal
Osd language English
Power requirements 10 - 15 vdc
Operating temp. 35 - 115 degrees
fahrenheit
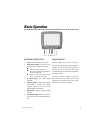
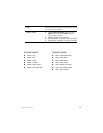
INSTALLING THE MONITOR
All monitors that work with the OHC100 attach
to the monitor door in the same way.
■
Start with the monitor door in the viewing
position.
■
At both bottom corners of the monitor are
spring-loaded monitor mounts. Place one
of these against the mounting bracket (2)
and guide the other end of the monitor
into the bracket on the other side of the
monitor.
■
Tilt the monitor up into the mount and
press firmly until a click is heard. The con-
nector at the back of the monitor is self-
guiding and will connect automatically to
the monitor connector (4).
■
The Hot Foot adapter is for use with the
MMS1 Universal Monitor Mounting Pedestal.
Place the Hot Foot adapter mounting plate
onto the monitor connector and secure
using the provided machine screws.
REMOVING THE MONITOR
■
With the monitor door in the viewing
position, press the monitor release button
(1). At the same time, gently tilt the top of
the monitor down. Firmly hold the monitor
while pressing to one side and pull away
from the monitor door.
Installation