50
To transfer data from the MMC to the IntelliMap 320: press → to
L
OAD
|
ENT
.
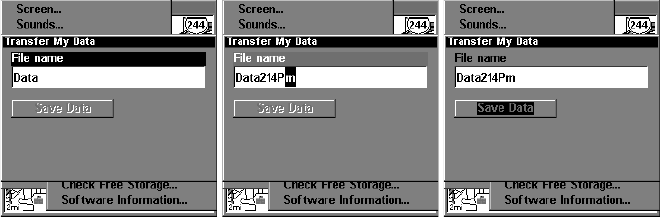
3. Saving to MMC: To accept the default name "Data" for the GPS
Data File, press ↓ to
S
AVE
D
ATA
|
ENT
. If you wish to rename the file (as
shown in the following figures), press
ENT
to activate the selection box.
Press ↑ or ↓ to change the first character, then press → to the next
character and repeat until the name is correct. Then, press
ENT
|↓ to
S
AVE
D
ATA
|
ENT
.
The IntelliMap 320 will display first a progress then a completion mes-
sage when the data transfer is finished. To return to the Page view,
repeatedly press
EXIT
.
From left to right, these figures show the menu sequence for naming
and saving a GPS Data File from the IntelliMap 320's memory to an
MMC.
4. Loading to unit memory: There may be more than one GPS Data
File (*.USR) on the card. To select a file, press
ENT
to activate the selec-
tion box, use ↓ or ↑ to highlight the file, then press
ENT
to accept the
selection. Next, press ↓ to
L
OAD
|
ENT
. The IntelliMap 320 will display a
completion message when the data transfer is finished. To return to the
Page view, press
EXIT
|
EXIT
|
EXIT
|
EXIT
.


