viii English
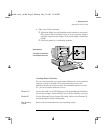
3 How to Install Accessories In Your PC
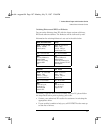
Supported HP Accessories . . . . . . . . . . . . . . . . . . . . . . . . . . . . . . . . . 20
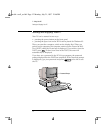
Removing the Cover. . . . . . . . . . . . . . . . . . . . . . . . . . . . . . . . . . . . . . . 22
Replacing the Cover after Installing Accessories . . . . . . . . . . . . . . . . . . 23
Moving and Replacing the Power Supply . . . . . . . . . . . . . . . . . . . . . 24
Replacing the Power Supply after Installing Accessories. . . . . . . . . . . . 25
Installing Memory. . . . . . . . . . . . . . . . . . . . . . . . . . . . . . . . . . . . . . . . . 26
Main Memory Modules . . . . . . . . . . . . . . . . . . . . . . . . . . . . . . . . . . . . . . . 26
Installing a Video Memory Upgrade . . . . . . . . . . . . . . . . . . . . . . . . . . . . . 28
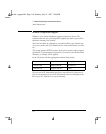
Installing Accessory Boards . . . . . . . . . . . . . . . . . . . . . . . . . . . . . . . . 31
Configuring Accessory Boards with Plug and Play (Windows 3.11) . . . 31
Configuring non-Plug and Play ISA Accessory Boards . . . . . . . . . . . . . . 31
Installing the Board. . . . . . . . . . . . . . . . . . . . . . . . . . . . . . . . . . . . . . . . . . 33
Installing Mass Storage Devices. . . . . . . . . . . . . . . . . . . . . . . . . . . . . 35
Installing a Flexible Disk Drive or a CD-ROM Drive
in the Middle Shelf . . . . . . . . . . . . . . . . . . . . . . . . . . . . . . . . . . . . . . . . . . 36
Installing an IDE Hard Disk Drive in the Rear Shelf . . . . . . . . . . . . . . . . 38
Installing a 3.5-inch Disk Drive in the Bottom Shelf . . . . . . . . . . . . . . . . 41
Installing a 5.25-inch Drive in the Bottom Shelf . . . . . . . . . . . . . . . . . . . 44
Configuring the Device or Devices you have installed . . . . . . . . . . . . . . 46
Installing an Upgrade Processor . . . . . . . . . . . . . . . . . . . . . . . . . . . . 47
Installing the Security Bracket . . . . . . . . . . . . . . . . . . . . . . . . . . . . . . 49
uno.bk : uno.toc Page viii Monday, July 21, 1997 12:46 PM