EN
Configuring for LPD Printing 69
Configuring a Network Printer for Windows 2000
Systems
Set up the default printer by performing the following steps.
1. Verify that the Print Services for Unix is installed (required for
LPR port availability):
a. Click Start, Setup, and Control Panel. Double-click the
Network and Dial-up Connections folder.
b. Click the Advanced menu and select Optional
Networking Components.
c. Select and enable Other Network File and Print
Services.
d. Click Details, and verify that Print Services for Unix is
enabled. If not, enable it.
e. Click Okay, and then Next.
2. Open the Printers folder (from the Desktop, click Start,
Settings, and Printers).
3. Double-click Add Printer. From the Add Printer Wizard
welcome screen, click Next.
4. Select Local printer, and disable automatic detection for Plug
and Play printer installation. Click Next.
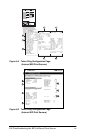
5. Choose Create a new port, and select LPR Port. Click Next.
6. In the
Add LPR compatible printer
window:
■
Enter the DNS name or IP address of the HP JetDirect print
server.
■
Enter (in lower case) raw, text, or auto for the name of the
printer or print queue on the HP JetDirect print server.
Then click OK.