10
PARALLEL, STEREO, OR BRIDGED
OPERATION
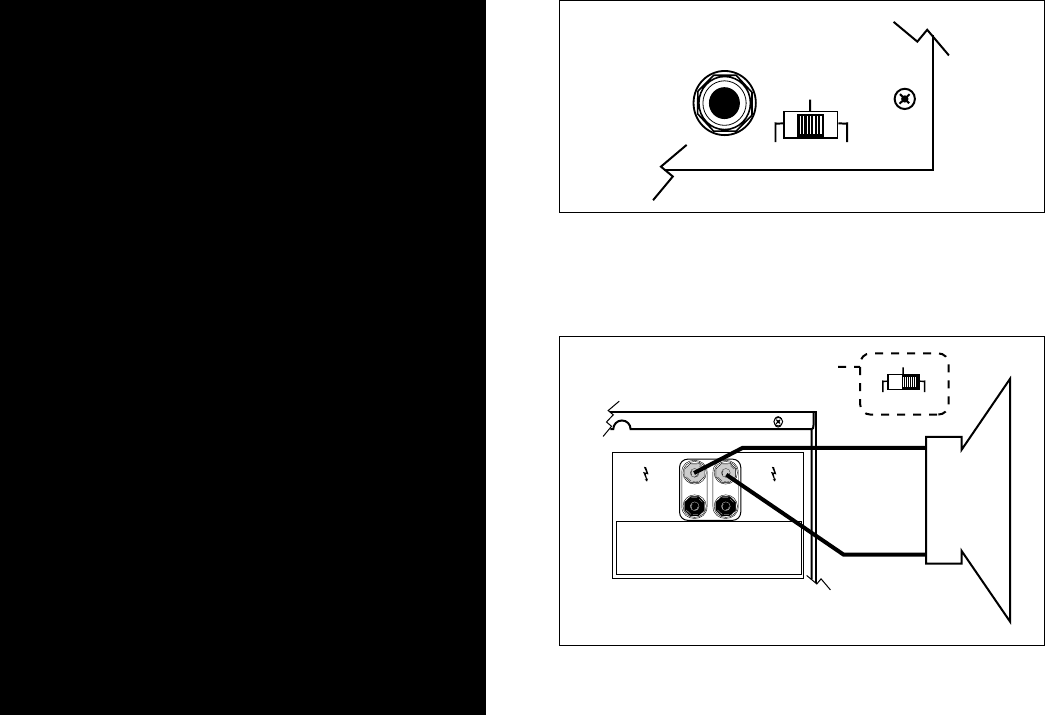
The Parallel-Stereo-Bridge switch is located on the input
panel, next to the input jack for channel 1).
The most commonly used operating mode for a power
amplifier is “Stereo,” in which the two channels are
independent and separate all the way from input to
output. Set the switch in the center position for stereo
operation.
“Parallel” ties the two channel inputs together so that both
will be driven by the same signal, without the need for
external jumpers or wiring. After the inputs both channels
operate independently; though they carry the same sig-
nal, their gain controls affect only their respective chan-
nels, and they must use separate speakers. Never par-
allel the speaker outputs!
The “Bridge” position uses both channels to provide
about three times the power to a single speaker load that
a single channel does. In this position the switch feeds
channel 2 with an inverted signal from channel 1. Thus,
when one channel “pushes,” the other “pulls,” providing
twice the voltage swing of a single channel.
INSTRUCTIONS FOR BRIDGED
OPERATION
1. Set the switch to the “Bridge” position.
2. Connect the signal to channel 1’s input only.
Do not connect anything to the input of
channel 2.
3. Turn up the gain on channel 2 all the way.
Use channel 1’s gain control to set the level.
Both channels’ “SIG” and “CLIP” indicators
should flash identically. (If you have used
other amplifiers, this step may be different.
But it is correct; in the bridged mode, chan-
nel 2 receives its feed from a sample of
channel 1’s output. The sample is calibrated
such that channel 2, at full gain, will produce
a voltage equal in magnitude but opposite in
polarity to channel 1’s.
4. Connect the single speaker load across the
red binding posts of the amplifier outputs as
shown in Figure 2-2. The positive speaker
wire goes to channel 1, and the negative to
channel 2.
CH 1
TIP NEG RING POS
SLEEVE GND
STEREO
PARALLEL BRIDGE
BRIDGED MONO
CHANNEL 2
––
–
+
–
+
CHANNEL 1
STEREO 4 OHM MIN/CH.
BRIDGED MONO 8 OHM MIN.
CLASS 2 WIRING
CLASS 1 WIRING MUST BE USED
BRIDGED MONO OPERATION: PLACE BRIDGING SWITCH ON INPUT PANEL
TO BRIDGED POSITION. CONNECT INPUT SIGNAL TO CH 1 ONLY.
CONNECT SPKR (+) TO CH 1 (+) OUTPUT. CONNECT SPEAKER (–) TO
CH 2 (+) OUTPUT. SET CH 2 GAIN FULLY CLOCKWISE AND REGULATE
LEVEL WITH CH 1 GAIN CONTROL.
CONNECT ONE SPEAKER LOAD ONLY.
–
+
Switch on Input Panel
(Left side of rear panel)
STEREO
PARALLEL BRIDGE
Figure 6: Parallel-Stereo-Bridge switch shown in the
normal (Stereo) mode position.
Figure 7: For Bridge mode, use CH 1 input only, and set
Input switch and connect load as shown.
BRIDGED-MONO MODE CAUTION:
The voltage across the output terminals of a bridged MXa
amplifier may equal or exceed 100 volts rms and may be
as high as 170 volts (MX 3000a), 130 volts (MX 2000a), or
120 volts (MX 1500a). Use fully insulated CLASS ONE
wiring, and the load must be rated for up to 2400 watts (@
8 ohms) for the MX 3000a, 1300 watts (@ 8 ohms) for the
MX 2000a, 1000 watts (@ 8 ohms) for the MX 1500a, and
700 watts (@ 8 ohms) for the MX 1000a.
VORSICHT BEIM ÜBERBRÜCKTEN
MONO-MODUS:
Zwischen den überbrückten Terminals eines MXa-
Verstärkers besteht eine Ausgangsspannung mit einem
quadratischen Mittelwert von mehr als 100 Volt und
vielleicht von bis zu 170 Volt (MX 3000a), 130 Volt (MX
2000a), oder 120 Volt (MX1500a). Zu verwenden ist voll
isolierte Verdrahtung der US-Klasse Eins, und die
angeschlossene Belastung muß für bis zu 2400 Watt (8
Ohm) beim MX 3000a, 1300 Watt (8 Ohm) beim MX 2000a,
1000 Watt (8 Ohm) beim MX 1500a, und 700 Watt (8 Ohm)
beim MX 1000a ausgelegt sein.
