Camera–Camcorder 48
Screen Layout
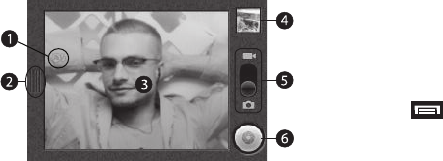
Screen Indicators and Buttons
1.
Flash
— Camera only — Indicates the flash setting (
Auto
shown).
2.
Settings
— Touch to open the
Camera
/
Camcorder settings
menu.
3.
Viewfinder
— Displays the image currently seen by the
Camera lens.
4.
Thumbnail
— Displays the last picture you took with the
Camera or the first frame of the last video you recorded
with the Camcorder.
5.
Mode
— Swipe down for Camera mode (as shown), swipe
up for Camcorder mode.
6.
Take
/
Record
/
Stop
— Takes pictures (Camera) or starts
and stops video recordings (Camcorder).
Camera-Camcorder Settings
To access the Camera or Camcorder settings menu, do the
following:
ᮣ
From the Camera / Camcorder viewfinder screen, touch
➔
Settings
. The
Camera
/
Camcorder settings
menu
opens with the following available settings:
•Flash mode
—
Auto
/
On
/
Off
— Take photos or record videos in
low light conditions.
• Video quality
(Camcorder only) —
Low (for MMS messages)
/
High (for SD card)
— Control video clarity and file size as needed.
• Video duration
(Camcorder only) —
60 seconds (for MMS)
/
10 minutes
/
30 minutes
— Control video file size as needed.
• White balance
—
Auto
/
Incandescent
/
Daylight
/
Fluorescent
/
Cloudy
— Select how the Camera / Camcorder responds to
available light.
• Color effect
—
None
/
Mono
/
Sepia
/
Negative
/
Aqua
/
Whiteboard
— Apply special color effects to your pictures / videos.
• Store location
(Camera only) —
Off
/
On
— Save location
coordinates where pictures are taken. Lets you Show on Maps
where you took a selected picture. (See “Show on Maps” on
page 50.)
•Picture size
(Camera only) —
3M Pixels
/
2M Pixels
/
1M Pixels
— Control picture size and file size as needed.


