


Installing the Software in Windows 2000
17
12 Perform any necessary TCP/IP configuration and click OK when
finished.
For help in configuring TCP/IP protocol, consult your Microsoft
Windows NT 4.0 documentation.
13 When prompted to restart your computer, click Yes.
The system restarts, using the new configuration settings.
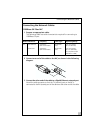
14 When the system returns to proper operation, verify that the NIC
port LEDs operate as described in the 3Com Gigabit EtherLink
Server NIC User’s Guide for Windows 2000 and Windows NT.
Installing the Software in Windows 2000
The 3Com Gigabit Etherlink Server NIC must be physically installed in your
server or workstation prior to installing the driver software. See Chapter 1,
“Installing the NIC” for details.
When the Windows 2000 system first starts up after installing a new hardware
device such as a NIC, the system automatically detects the new hardware and
prompts you to install the driver software for the device.
To install the NIC software for Windows 2000:
1 Verify that the Windows 2000 system is upgraded to the latest version.
2 Start your Windows 2000 system and log in.
You must have Network Administrator privileges to install the driver software.
When you boot up the Windows 2000 system after installing the NIC, a
series of “Found New Hardware Wizard” windows appear.
3 In the Install Hardware Device Drivers window, click Search for a
suitable driver for my device (recommended), then click Next.
4 In the Locate Driver Files window, check the CD-ROM drives box.
5 When prompted, insert the NIC CD into your system’s CD-ROM
drive, type the path to the driver, and select OK.
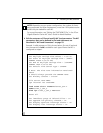
The path on the CD-ROM is as follows:
e:\
Where “e” is the designation of the CD-ROM drive on your system.
NOTE: If other NICs in your system use TCP/IP bindings, the TCP/IP
Properties window opens.