


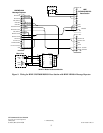

2
Mode Configuration
The 3M Noise Reduction Board can be configured in several different modes by setting DIP switch, SW2.
Following is a brief description of each mode and a DIP switch setting table.
Noise Reduction: With SW2 number 1 ON, the inbound microphone voice signal is digitized. The noise is
digitally removed from the voice and converted back to an analog voice signal. The analog voice signal is
then sent to the microphone input of the intercom.
Echo Reduction: With SW2 number 2 ON, echo is reduced for full-duplex intercom systems. Set SW2
number 2 OFF for half-duplex systems.
Restaurant/Truck Stop Noise Reduction Level: With SW2 number 3 OFF, the A121 is set for restaurant noise
reduction level. With SW2 number 3 ON, the A121 is used for truck stop noise reduction level, which
provides more noise reduction with slightly more voice degradation.
Hi Frequency Equalization: With SW2 number 4 ON, the higher-end frequencies are increased by 3 dB. This
should be set to the customer’s preference.
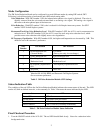
SW2
Number
ON Position OFF Position
1 *Noise Reduction ON
(Normal Mode)
Test Mode
(Factory use only; do not change.)
2 *
1
Echo Reduction ON Echo Reduction OFF
3
2
Truck Stop Noise
Reduction Level
*
2
Restaurant Noise
Reduction Level
4
2
Hi Frequency Equalization
ON
*
2
Hi Frequency Equalization OFF
5 Not Used Not Used
Notes: * Indicates factory settings.
1
Must be ON for 3M, HME, and Panasonic Full Duplex Systems
2
Set to customer preference.
Table 2. 3M Noise Reduction Module SW2 Settings
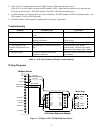
Status Indication Table
The condition of the red LED on the 3m Noise Reduction Module indicates the current status of the unit. The LED
can be off, blink at defined intervals, or be constantly lit Table 3 illustrates the status indicated by the LED.
Status LED
Power OFF LED off.
Normal Mode LED blinks once per second.
Test Mode LED blinks three times per second.
Fault Condition LED is solid red (constantly illuminated).
Table 3. 3M Noise Reduction Module Status Indication
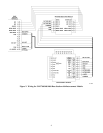
Final Checkout Procedure
1. Turn the ON/OFF switch of the A121 ON. The red LED should blink slowly. Listen for a reduction in the
background noise.