


7
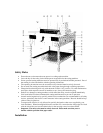
IDEAL 6550-90: Remove knife screws (B and C).
Loosen knife holders and lower the knife downwards from the knife carrier (#19). Then, due
to the length of the knife, a sideways movement between the knife guide plates is required for
removal.
h. Take out cutting stick (#2), turn, rotate or exchange it and place it back into machine.
IMPORTANT – Hook cutting stick into pin, which is located on the left between the knife
guide plates.
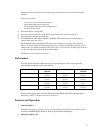
i. IDEAL 4850-90 (5250): Insert knife holders into second and fourth threaded hole (B and D)
of the sharp knife.
IDEAL 6550-90: Insert knife holders into the first and fourth threaded holes from the left (A
and D) of the new knife.
Ensure that the ends of the knife holders are not protruding from the other side of the knife.
Place knife (#20) into knife carrier (#19) and secure with knife holders.
j. IDEAL 4850-90 (5250): Screw in knife screws (A and C) – snuggly, don’t tighten.
IDEAL 6550-90: Screw in knife screws (B and C) – snuggly, don’t tighten.
k. Remove knife holders. Screw in knife screws in their place - snuggly, don’t tighten.
l. Spread one to three sheets of paper across the entire cutting length. Bring the knife (#2)
down. Release either push button (#5 or #15) and turn main switch (#13) to position “0”
(off). The knife remains in its lowest position.
m. Screw in knife screw (E) – snuggly, don’t tighten.
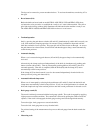
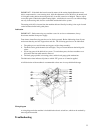
n. The parallel adjustment of the knife is done via the knife adjustment screws. Push knife down
by screwing in the knife adjustment screws (X, Y and Z) evenly, until the paper is cut across
its whole length.
o. Should the scope of the adjustment available by means of the knife adjustment screws be
insufficient, resort to the knife depth adjustment screw (#4). Turn it in steps of half a turn
clockwise (+). After each step a test cut has to be executed.
If the paper is cut through only on one side, proceed with parallel adjustment of knife as
described under (#!2 and #14).
IMPORTANT – Both the above methods (#14 and #15) of knife adjustment offer and
adjustment range of approximately 5 mm (1 / 4”).
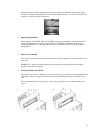
p. Tighten knife screws (B, C, D and E) firmly while the knife is lowered on the cutting stick.
q. Turn main switch (#13) to position “|” (on) securing screw (F) for knife adjustment flap (#21).
r. Make a test cut with a paper pile using the full cutting height. If necessary do a final
adjustment with the cutting depth adjustment screw (#4).
s. IMPORTANT – The clamp bar must be adjusted in a way that the cutting edge of the
knife in its home position is covered by the clamp bar.
Changing of cutting stick
Should the bottom sheet of a paper pile not be cut across its full length, the cutting stick (#2) must
be turned , rotated or exchanged.