


Installing the Switch
3
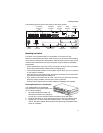
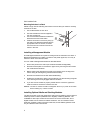
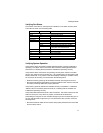
The following figure shows the components of this switch system:
Mounting the Switch
This switch can be placed directly on your desktop, or mounted in a rack.
Before you start installing the switch, make sure you can provide the right operating
environment, including power requirements, sufficient physical space, and proximity
to other network devices that are to be connected. Verify the following installation
requirements:
• Power requirements: 100 to 240 VAC (± 10%) at 50 to 60 Hz (± 3Hz). The switch’s
power supply automatically adjusts to the input voltage level.
• The switch should be located in a cool dry place, with at least 10 cm. (4 in.) of space
on the sides for ventilation.
• Place the switch out of direct sunlight, and away from heat sources or areas with a
high amount of electromagnetic interference.
• If you intend to mount the switch in a rack, make sure you have all the necessary
mounting screws, brackets, bolts and nuts, and the right tools.
• Check if network cables and connectors needed for installation are available.
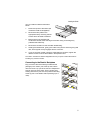
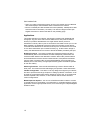
Stacking Switches on a Flat Surface
The CheetahSwitch can be stacked
anywhere there is enough flat space, such
as on a table or desktop.
1. Stick the self-adhesive rubber foot
pads (that come with this package) on
each of the 4 concave spaces located on the bottom of the first switch.
2. Place the first switch on a firm flat surface where you want to install the stack.
3. Repeat step 1 for each switch before stacking them. The rubber foot pads
cushion the switch against shock/vibrations and provide space between each
switch for ventilation.
1
DC INPUT
VA
3.3 15
53
12 0.7
100-240V~50-60Hz 2A
Port Status
Indicators
10/100 Mbps
RJ-45 Ports
Power
Socket
RPU
Connector
Module
Indicators
Mode
Selection
System
Indicators
Media or Stacking
Module Slot
Media
Module Slot
Management
Module Slot
1
1