


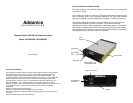


Powering On the Drive Cartridge System:
Note: Be sure the Diamond cipher key is inserted into the drive enclosure prior
to turning on the power of the drive cradle. The hard drive will not be
detected by the computer if the power to the drive cradle is turned on
without the Cipher key. Under such condition, the power on the drive
cradle will have to be turned off and turned back on again with the
Cipher key already inserted into the drive enclosure in order to detect
the hard drive.
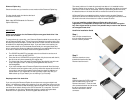
Power Switch:
To power on the enclosure, use the key provided to turn the locking mechanism
on the drive cradle into the Lock position. When the switch is turned on, the
green LED located on the left side of the drive cradle would light up to indicate
power. The encryption key LED will also light up. The amber LED will blink if
there is drive activity.
Note: There are no drivers needed to use the eSATA cable as long as the
drivers are installed for the Serial ATA Controller card/chip. It is plug
and play.
Brand new hard drive must be partitioned and formatted first before a
drive letter is assigned by the OS. When a hard drive with data on it is
formatted with the Diamond cipher all the data will be erased.
Once the drive is detected by the system OS, the Diamond cipher key may be
removed from the drive enclosure. The encryption key LED will turn off but the
Diamond Cipher hard drive will continue operating normally (encrypting) till it is
removed from the system or powered off.
Model: DCHD256EU
Power: Using the 4-pin floppy connector of the Y-cable, connect it to the floppy-
type power connector on the converter. To provide power for the y-cable,
connect it to one of your desktop's 4-pin molex cable.
Data:
Internal Connection
Use the USB 5-pin header cable to connect to the 5-pin connection on the
converter located below the USB Type B connector to the 5-pin USB connection
on your motherboard.
External Connection
Use the USB Type A-B data cable to connect the converter to the USB port on
your system.
LED cable: Only needed if you want to get drive access signal from the SATA to
USB2.0 converter. Use the LED cable to connect the LED pin located at the back
of the cradle (beside the LED switch) to the LED jumper pins on the SATA to
USB2.0 converter to enable the drive activity LED.
Factory default, LED signal coming from hard drive.
Technical Support
If you need assistance to get your unit functioning properly, please call Addonics
Technical Support. Our technical staff will be happy to assist you, but they will
need your help to do so. Calling the technical support staff without all the proper
information can be both time consuming and frustrating. Here are some tips to
help you out:
MODEL NUMBER – Please have this number on hand.
SYSTEM INFORMATION – Type of computer, peripherals, etc.
OPERATING SYSTEM – What version of Windows
WHAT’S THE TROUBLE? – Give enough information
about your problem so that we can recreate and diagnose it.
FREE Software Drivers for all Addonics Technologies
Products are available 24 hours per day at the World Wide Web Site:
www.addonics.com
Contact Information
Phone: 408-573-8580 Fax: 408-573-8588
Email: http://www.addonics.com/sales/query/
Internet: http://www.addonics.com
TECHNICAL SUPPORT
Phone: 408-453-6212
Hours: 8:30 am - 6:00 pm PST
Email: http://www.addonics.com/support/query/