


www.addonics.com Technical Support (M-F 8:30am - 6:00pm PST) Phone: 408-453-6212 Email: www.addonics.com/support/query/
I. NAS2XU2 Hardware Installation
1. Connect external USB Storage device into USB port of the NAS
Adapter. Power on the USB Storage device.
2. Connect LAN cable via LAN switch and Router.
3. Connect 5V power adapter to power up the NAS adapter
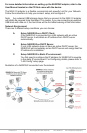
NAS2XU2 connected directly to a computer’s NIC card
If you connect the NAS2XU2 to a computer directly, the will act as a DHCP server,
assigning itself an IP address automatically and will also assign an IP address to the
computer’s network card. This configuration will not enable you to see the drive on
the network.
NAS2XU2 connected to a Router or Switch
When the NAS2XU2 is connected to a LAN network with an active DHCP server, it
will obtain an IP address from DHCP server automatically. Or if your LAN network
does not have an active DHCP server, NAS2XU2 will immediately act as DHCP
server and assign itself an IP address for installation.
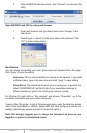
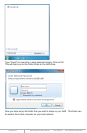
II. Search NAS2XU2 using SDisk Utility
1. Browse the CD enclosed in the product package. Copy and paste
“SDisk Utility” in to your computer then double click the icon to start
search.
Note: “SDisk utility” was written with JAVA script, please make sure your computer
has installed JAVA before, if not please install the JAVA JRE from the CD drive.
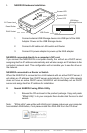
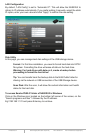
Access LED
System LED
Power LED
5V Power Jack
Reset Button
RJ45 Socket
USB Printer
USB Mass
Storage Device