8 Installing the Hardware June 2007
Rack-Mounting the Switch
Refer to the important guidelines below before installing the
OmniSwitch chassis in a rack.
• It is recommended that two people install the switch in
the rack—one person to hold the chassis and position it
in the rack, and a second person to secure the chassis to
the rack using attachment screws (not supplied).
• Alcatel-Lucent provides two rack-mount flanges with
each OmniSwitch 6850 Series switch. These flanges
support standard 19-inch rack mount installations.
These flanges must be attached to the chassis before
the switch can be rack mounted.
Note. If you are installing the switch in a 23-inch wide
rack, Alcatel-Lucent offers optional 23-inch rack-mount-
ing hardware. For more information, contact your Alcatel-
Lucent representative.
• Alcatel-Lucent does not provide rack-mount screws.
Use the screws supplied by the rack vendor.
• To prevent a rack from becoming top heavy, it is
recommended that you install heavier equipment at the
bottom of the rack whenever possible.
• If you are installing the switch in a relay rack, be sure
to install and secure the rack as per the rack manufac-
turer’s specifications.
• Review page 6 for important chassis airflow and access
recommendations before installing.
Rack Mounting Steps
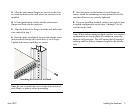
To rack-mount the switch, follow the steps below:
Note. Rack-mount flanges may come factory-installed in
some cases. If this is the case, skip steps 1 and 2 below.
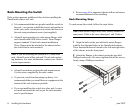
1 Align the holes in the provided rack-mount flanges
with the four threaded holes in the OmniSwitch chassis.
These threaded holes are located in the left and right sides
of the chassis, near the front panel.
2 Attach the flanges to the chassis using the provided
Phillips-head screws. Be sure to tighten each of the screws
firmly using a Phillips screwdriver.
Attaching a Rack-Mount Flange
45
46
Co nso le


