


AT-FH800 Series Installation Guide
9
Using an Optional
Module
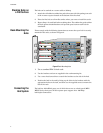
The upper slot on the front of the hub is provided for installing anyone of the 3
different Switch Modules or Media Expansion Modules (also referred to as an
uplink module). The Switch Module is used to bridge the internal 10 and 100 Mbps
repeater buses, the twisted-pair and fiber optic uplink modules are used to link the
stack to other segments or to a remote site.
Note
The Media Expansion Modules confine local traffic to the stack, passing traffic to
the attached device only when required.
The lower slot on the front panel is used for installing an Agent Module, which
provides management access to the hub or the connected stack using a direct
console or modem connection via Telnet, a web browser, or SNMP/RMON
management software.
Installing an
Optional Module
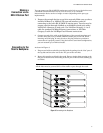
To install an optional module, do the following:
1. Disconnect power to the hub.
2. Remove the face plate (or a previously installed module) from the appropriate
slot by removing the two screws with a cross-head screwdriver. A Switch
Module or uplink module can be installed in the upper slot on the front of the
hub, and the Agent Module can be installed in the lower slot on the front of the
hub.
3. Before opening the package that contains the uplink module, touch the bag to
the hub casing to discharge any potential static electricity.
4. Remove the module from the anti-static shielded bag.
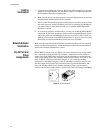
5. Holding the module level, gently push it all the way into the expansion slot,
ensuring that it firmly engages with the connector.
6. If you are sure the module is properly mated with the connector, replace the
retainer screws to secure the module in the expansion slot.
7. Run corresponding media type between the uplink module and the target
device.
Note
Uplink modules are not hot-swappable. Be sure you power OFF the switch before
installing any of these modules.